
Transplanting
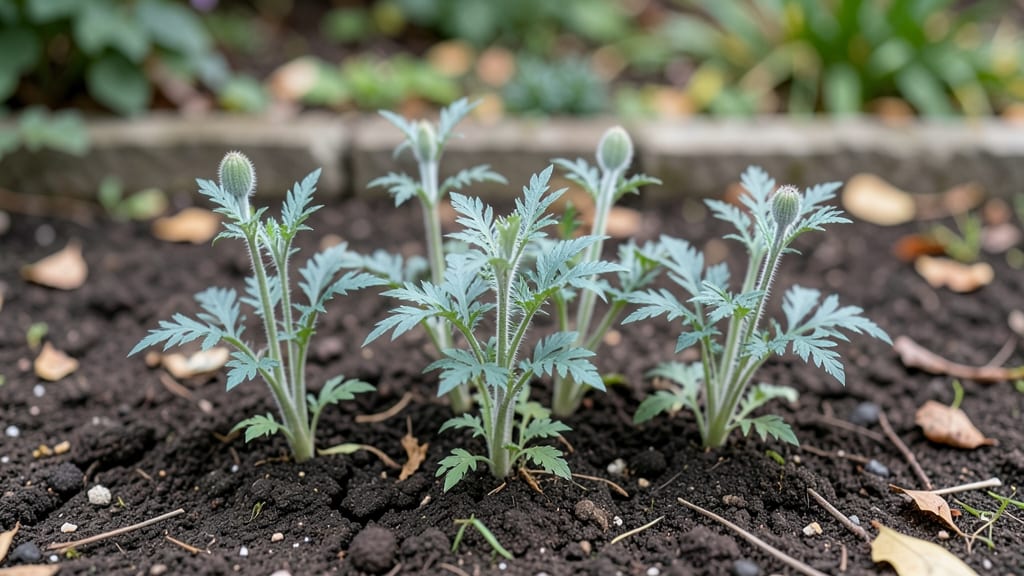
Twisting breadseed poppy pods ruin the harvest—here’s how to grow straight, sturdy seedlings from the start. 🌱 I’ve lost count of the years I let those spiraling stems mess up my seed collection, until I discovered the simple soil and spacing tricks that keep them growing true.
The secret lies in light, loose soil—never compacted—and planting seeds just ¼ inch deep, no deeper. Too much moisture or heavy soil makes them lean, and you end up with gnarled stems.
A sunny windowsill or grow light keeps them reaching upward naturally, while thinning to 2 inches apart prevents competition for nutrients. By the time they’re 4 inches tall, you’ll see straight stems ready for transplanting. The pods form plump and symmetrical, with seeds that spill out easily when ripe.
No more tangled mess—just clean, usable poppy seeds for next year’s garden. This method works in containers or beds, and the same principles apply whether you’re growing for seeds, flowers, or both. Let’s get those seedlings off to the right start!
📚 In This Guide
- What you need
- Instructions
- Tips and common mistakes
- Wrapping up and next steps
What you need
- ● Breadseed poppy seeds: 1 packet (typically 500–1,000 seeds, non-GMO preferred for best results).
- ● Seed-starting trays or pots: 2–4" deep, with drainage holes (biodegradable pots work great too!).
- ● Seed-starting mix: Lightweight, sterile potting soil (avoid garden soil—it’s too dense!).
- ● Spray bottle: For gentle watering (poppy seeds need moisture, not drowning!).
- ● Plastic wrap or humidity dome: To retain warmth and moisture during germination.
- ● Grow lights or sunny windowsill: Poppies crave bright light (6+ hours daily).
- ○ Fertilizer (optional but helpful): A balanced, water-soluble fertilizer (5-10-5 ratio) for seedlings.
- ● Fine-mist sprayer: For even moisture distribution.
- ● Small hand trowel: For gently pressing seeds into soil.
- ● Toothpicks or chopsticks: To label trays if growing multiple varieties.
- ○ Heat mat (optional): Speeds up germination (70–75°F is ideal).
- ● Pruning shears: For thinning seedlings later (if overcrowded).
Step-by-Step instructions for germinating breadseed poppy seedlings
Here’s how to coax those stubborn poppy seeds into strong, twist-free seedlings—no fuss, just results.
🌱 Step 1: Prep Seeds and Soil for Optimal Germination
Breadseed poppies need a light, airy start. Fill your seed trays with a sterile seed-starting mix—never garden soil, which compacts and slows germination. I like to mix in 10% perlite to improve drainage, since poppies despise soggy roots. Moisten the mix until it’s damp like a wrung-out sponge, then let it settle for 10 minutes before sowing.
Poppy seeds are tiny, so I use a fine-mesh sieve to distribute them evenly. Sprinkle seeds ¼ inch deep—any deeper and they’ll struggle to reach light. Space them ½ inch apart in rows to avoid overcrowding later. A gentle tap on the tray helps them nestle into the soil without burying too deep.
💧 Step 2: Create a Humid, Warm Germination Environment
Poppy seeds germinate best in consistent warmth (70-75°F) and high humidity. I place the trays on a seedling heat mat set to 75°F and cover them with a clear plastic dome or plastic wrap. This traps moisture while keeping the soil warm—critical for breaking their stubborn dormancy.
Check daily for condensation on the dome. If it fogs up, the humidity is perfect. If it stays dry, mist the soil lightly with a spray bottle. Avoid soaking—poppy seeds rot faster than they sprout. Germination takes 10-14 days, but don’t be surprised if some pop up in 7 days or drag out to 3 weeks. Patience pays off.
☀️ Step 3: Introduce Light Gradually to Prevent Leggy Growth
Once seedlings emerge, remove the dome immediately to prevent damping-off. Place them under a grow light (12-14 hours daily) 2-3 inches away. Poppies stretch toward light like weeds, so I adjust the light height every 3-4 days to keep them compact. You’ll spot leggy seedlings as tall, pale stems with leaves spaced far apart.
Rotate the trays quarter-turn daily so they grow straight, not lopsided. If natural light is your only option, a south-facing window works, but supplement with a light if seedlings lean toward the glass. Strong poppy seedlings have bold green leaves and thick stems—never let them get etiolated (stretched and weak).
✂️ Step 4: Thin and Harden Off for Transplant-Ready Seedlings
When seedlings have 2-3 true leaves (not the tiny cotyledons), thin to 1 seedling per cell using scissors to snip at soil level. Poppies handle thinning better than most—just avoid pulling, which disturbs roots. I transplant thinned seedlings into 2-inch pots with fresh mix to give them room to grow.
Start hardening off 2 weeks before your last frost. Move trays outside for 1 hour daily, gradually increasing time. Watch for wilting or leaf burn—signs they’re not ready. Poppies thrive in full sun but need time to adjust. Once they tolerate 6+ hours outside without stress, they’re ready for the garden.
🌿 Step 5: Plant Out for Twist-Free Pods
Poppies hate root disturbance, so transplant on a cool, cloudy day to reduce shock. Space them 12-18 inches apart in well-draining soil—they’ll resent soggy feet. I mix in compost at planting time for nutrients, but avoid fertilizing until after flowering. Poppies grow fast once established.
Here’s the trick for twist-free pods: Stake tall varieties early. Drive a 4-6 inch stake beside each plant at transplanting. As stems grow, loosely tie them to the stake with soft twine—just enough to guide growth, not restrict it. This prevents the classic poppy "twist" while pods develop.
Tips & tricks for perfect breadseed poppy seedlings
These game-changing tricks will help you bypass the most common pitfalls when growing breadseed poppies from seed.
The Soil Prep Secret: Don't just moisten your sterile seed-starting mix—work that 10% perlite into the soil thoroughly before adding water. Poppy seeds need that airy environment from day one. I actually mix perlite in a separate bowl first, then fold it into the soil gently to avoid compacting it. Too much handling can defeat the purpose of that light, fluffy texture they crave.
Temperature Matters: That 75°F heat mat setting is non-negotiable for stubborn poppy seeds. I've seen germination rates double when maintaining consistent warmth. Pro tip: If your heat mat doesn't have a temperature gauge, use an infrared thermometer to check the soil surface temperature—it should read exactly 75°F at seed level. Too cool and seeds may never sprout; too hot and they'll rot before emerging.
Light Management: When adjusting your grow light every 3-4 days in Step 3, pay attention to the seedlings' response. If they're stretching toward the light with pale stems, you need to lower it immediately. I keep a small ruler beside my grow light setup to track height adjustments—this prevents the "reaching" habit that leads to weak stems. The goal is to keep leaves just touching the light bulb without burning.
Staking Strategy: For that twist-free pod promise in Step 5, here's my pro move: Install those 4-6 inch stakes at planting time, but don't tie them until stems reach 6-8 inches tall. This gives roots time to establish before any support. I use soft garden twine (not wire) and make loose loops that can grow with the plant. Too tight too soon restricts natural movement and can actually cause twisting in the opposite direction!
Pro Tips for Breadseed Poppy Seedlings
- These game-changing tricks will help you bypass the most common pitfalls when growing breadseed poppies from seed.
- The Soil Prep Secret: Don't just moisten your sterile seed-starting mix—work that 10% perlite into the soil thoroughly before adding water.
- Temperature Matters: That 75°F heat mat setting is non-negotiable for stubborn poppy seeds.
Frequently asked questions
Got questions about growing breadseed poppy seedlings? You’re not alone! Here are some of the most common concerns—and their answers—to help you cultivate twist-free pods like a pro.
How long does it take for breadseed poppy seedlings to germinate?
Germination usually takes 7–14 days in ideal conditions (warm soil, consistent moisture, and indirect light). If your seeds haven’t sprouted after 2 weeks, gently check for mold or rot—sometimes they just need a little patience (or a light scratch on the seed coat to kickstart growth).
When is the best time to transplant breadseed poppy seedlings?
Wait until seedlings have 2–3 sets of true leaves (not just the initial cotyledons) and all danger of frost has passed. Early spring or late summer works best in most climates—just avoid transplanting in hot afternoons to reduce stress on delicate roots.
Can I grow breadseed poppies from store-bought poppy seeds?
Nope! Store-bought poppy seeds (like those from bagels) are milled for flavor and won’t germinate. You’ll need certified organic breadseed poppy seeds—look for varieties like ‘Spanish’ or ‘Blue Spanish’ for reliable pods.
Why are my seedlings twisting or growing unevenly?
Twisting often signals overcrowding or nutrient stress. Thin seedlings to 2–3 inches apart and ensure they get 6+ hours of sunlight daily. If stems look leggy, try a grow light or transplant deeper to stabilize roots.
Do breadseed poppy seedlings need cold stratification?
Not usually! Unlike some perennials, breadseed poppies don’t require cold treatment to germinate. Just keep soil temperatures between 60–75°F for best results. If your area has chilly nights, a cloche or row cover can help protect tender sprouts.
Still stumped? Drop your question in the comments—we’ve got your back!
Wrapping up and next steps
Growing breadseed poppy seedlings into twist-free pods is all about patience, the right conditions, and a little know-how! With the proper soil mix, consistent moisture, and strategic thinning, you’ll be rewarded with stunning, harvest-ready blooms. Don’t let a few hiccups discourage you—every gardener starts somewhere!
Ready to take the next step? Start small—plant a few seedlings now and refine your technique. Soon, you’ll be sharing your twist-free poppy pods with fellow gardeners (or even selling them!). Happy growing! 🌱✨