
Propagation
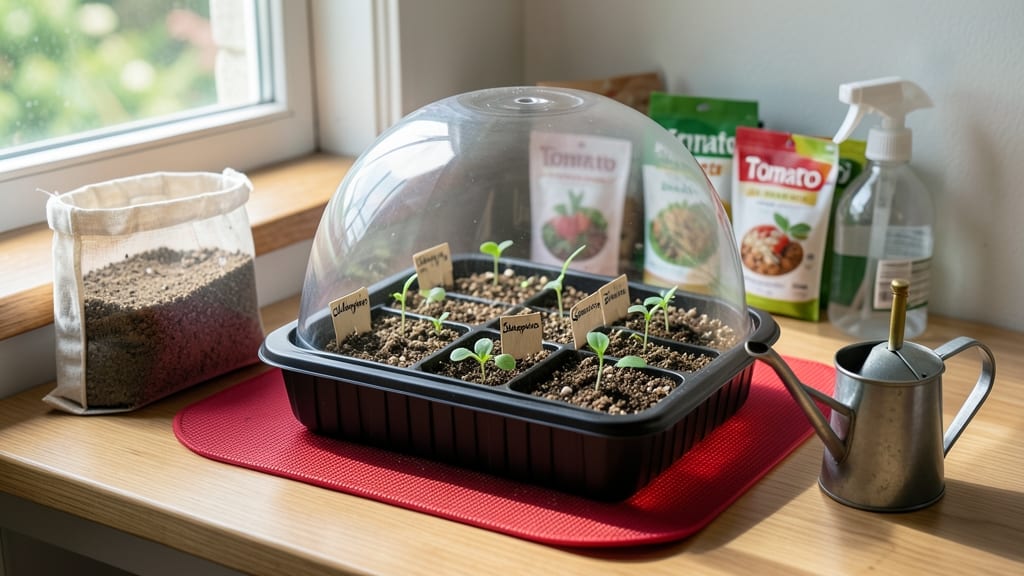
Burpee seed starting trays give seedlings the room to grow strong roots before they even meet soil. 🌱 I’ve used them for three seasons now, and the difference in transplant shock is night and day—my tomatoes and peppers now thrive instead of wilting after moving outdoors.
The key isn’t just the size but how you use them: proper drainage, consistent moisture, and the right timing to avoid leggy seedlings.
These trays work best with a lightweight seed-starting mix—nothing heavy or compacted. Fill them to just below the rim, tap gently to settle, and plant seeds at the depth recommended on the packet.
A spray bottle keeps moisture even without drowning the roots, and a small fan on low strengthens stems for outdoor life. Most seedlings are ready to transplant in 4-6 weeks, depending on the crop.
What sets Burpee trays apart is their balance of affordability and performance. Unlike peat pots that tear roots or DIY setups that lack structure, these trays hold moisture well while allowing excess to drain.
You’ll see thicker stems, more vibrant leaves, and plants that bounce back from transplanting like they’ve been there forever. The trays even stack neatly for storage when the season winds down.
For best results, start seeds indoors 6-8 weeks before your last frost date and keep them in a warm spot until sprouts appear. Avoid overwatering—the trays’ drainage holes are there for a reason. Once seedlings hit the 2-inch mark, they’re ready to graduate to bigger pots or the garden.
The investment in these trays pays off in healthier, hardier plants that reward you with bigger harvests all season long.
📚 In This Guide
- What you need
- Instructions
- Tips and common mistakes
- Wrapping up and next steps
What you need
- ● Burpee Seed Starting Trays – 1020-cell trays (or 72-cell for larger plants like tomatoes). Pro tip: 💡 Opt for biodegradable pots if transplanting directly into the garden.
- ● Seed Starting Mix – 1-2 bags (4-8 qt) of sterilized, peat-based or coconut coir mix (avoid garden soil—it compacts!).
- ● Seeds – Choose fast-growing varieties (e.g., lettuce, herbs, or flowers) or slower starters (tomatoes, peppers) for staggered planting.
- ● Watering Can or Spray Bottle – With a fine rose attachment to avoid displacing seeds.
- ● Grow Lights or Sunny Windowsill – A full-spectrum LED grow light (12-16 hrs/day) or a south-facing window (60°F+).
- ○ Heat Mat (Optional but Helpful) – For cold-starting seeds like peppers or tomatoes (70-80°F soil temp).
- ● Humidity Dome or Plastic Wrap – To retain moisture until germination.
- ● Seedling Heat Mat – Speeds up germination for tricky seeds.
- ● pH Testing Kit – Keep soil pH between 6.0-7.0 for optimal nutrient uptake.
- ● Fertilizer (Low-Dose) – A balanced 5-5-5 or fish emulsion (diluted to half-strength) after 2-3 weeks.
- ● Labeling Sticks or Twist Ties – Track varieties and planting dates!
- ● Tray Stand or Stackable Shelves – Maximize vertical space in small areas.
How to use Burpee seed starting trays for stronger seedlings
Here's how I've learned to get the most out of these trays—more room for roots means fewer transplant shocks.
🌱 Step 1: Prepare the Trays and Soil Mix
Start by filling each cell of the Burpee tray with sterile seed-starting mix—never garden soil, which compacts and smothers roots. I like to press the mix down gently with my fingers until it's firm but still loose enough to let air reach the seeds. The goal is a surface that holds its shape when you tap the tray but doesn't feel rock-hard.
Moisten the mix until it's damp like a wrung-out sponge—no puddles, no dry spots. You'll know it's right when water beads up on the surface but disappears within a few seconds. This ensures even moisture without drowning the seeds. I use a spray bottle for precision, avoiding the temptation to pour directly into cells.
🌱 Step 2: Plant Seeds at the Correct Depth
Check your seed packet for depth recommendations, but a good rule is to plant seeds at a depth of twice their diameter. For tiny seeds like lettuce, that's just a sprinkle on top; for larger seeds like beans, press them ½ inch deep. I use a toothpick to make a small hole in each cell—this keeps seeds from getting buried too deeply or too shallowly.
Place 1-2 seeds per cell (unless the packet says otherwise). If you plant two, thin to the strongest seedling later to avoid competition. Cover with a light dusting of soil, then mist the surface again until it's evenly damp. This prevents seeds from drying out before they germinate.
💧 Step 3: Provide Warmth and Consistent Moisture
Burpee trays have built-in domes that trap warmth and humidity—perfect for germination. Place the tray on a seedling heat mat set to 70-75°F for faster sprouting. Without a heat mat, keep the tray in the warmest part of your home, away from drafts. You'll see tiny sprouts in 5-14 days, depending on the plant.
Check moisture daily but resist watering until the soil surface feels dry to the touch. Overwatering now causes damping-off, a fungal disease that collapses seedlings overnight. Once sprouts appear, remove the dome immediately to prevent mold. Water from the bottom by placing the tray in ½ inch of water for 10 minutes—this encourages deep root growth.
☀️ Step 4: Move to Bright Light Immediately After Germination
The instant seedlings break through the soil, they need 12-16 hours of light daily. A south-facing window rarely provides enough intensity, so I use a grow light positioned 2-3 inches above the trays. Raise it as seedlings grow to maintain that distance. Without enough light, seedlings stretch toward the source, growing weak and leggy.
You'll know your light setup is right when seedlings have thick stems, dark green leaves, and compact spacing between leaves. If stems look thin and leaves are pale, the light is too far away. Rotate the tray a quarter turn daily so plants grow straight instead of leaning.
⏰ Step 5: Harden Off Before Transplanting
Two weeks before your last frost date, start hardening off seedlings by placing the Burpee tray outside in a shaded, sheltered spot for 1-2 hours the first day. Gradually increase outdoor time by 1 hour daily over 7-10 days, introducing more sun and wind each time. This toughens seedlings so they handle the garden better.
Watch for wilting or yellowing—signs they're not ready. Once seedlings tolerate a full day outside without stress, they're ready to transplant. Pop them out of the tray carefully, using the built-in root space to your advantage. The larger cells mean less root disturbance, so seedlings recover faster and grow stronger right away.
Tips & tricks for perfect seed starting with Burpee trays
These practical tricks will help you maximize the root space in Burpee trays for seedlings that thrive from start to transplant.
Soil Texture Matters: In Step 1, when pressing down the sterile seed-starting mix, aim for a consistency similar to a damp sponge—it should hold its shape when tapped but still allow air circulation. Too firm and you'll suffocate roots; too loose and seeds may sink unevenly. I find using a clean spoon to gently press each cell works best, creating that perfect balance. This texture prevents compaction while maintaining moisture without becoming waterlogged.
Precision Planting Technique: For Step 2, use a toothpick to create planting holes—this ensures seeds go exactly twice their diameter deep without overcrowding. I've found that planting two seeds per cell (when recommended) gives you a backup, but thinning to the strongest seedling prevents competition. The toothpick method also helps avoid burying seeds too deeply, which can delay germination or cause rot.
Lighting Optimization: When setting up your grow light in Step 4, position it just 2-3 inches above the trays initially. As seedlings grow, raise it to maintain this distance—this prevents leggy growth from stretching toward the light. I rotate the tray a quarter turn daily to ensure even growth, and I've noticed that seedlings develop thicker stems and darker green leaves when kept at this consistent distance.
Harden Off Gradually: During the hardening off process in Step 5, I've learned to watch for subtle signs of stress like wilting or yellowing leaves, which indicate the seedlings aren't ready for longer outdoor exposure. Start with just 1-2 hours in a sheltered spot, then increase by 1 hour daily. This gradual approach prevents transplant shock, and I've seen seedlings that handle the transition much better when introduced to outdoor conditions this way.
Pro Tips for Burpee Seed Starting Trays
- These practical tricks will help you maximize the root space in Burpee trays for seedlings that thrive from start to ...
- Soil Texture Matters: In Step 1, when pressing down the sterile seed-starting mix, aim for a consistency similar to a...
- Precision Planting Technique: For Step 2, use a toothpick to create planting holes—this ensures seeds go exactly twic...
Frequently asked questions
about Burpee seed starting trays—here’s what you need to know before diving in!What’s the best time to start seeds in Burpee trays?
Timing depends on your climate and crop. For cool-season veggies (like lettuce or spinach), start 6–8 weeks before the last frost. Warm-season plants (tomatoes, peppers) need 8–12 weeks before transplanting. Check Burpee’s seed packet for specific guidelines—it’s your best friend!
Can I reuse Burpee trays for multiple growing seasons?
Yes! Clean them thoroughly with a 10% bleach solution (1 part bleach to 9 parts water) to kill pathogens, then rinse well. Avoid reusing trays for the same plant family consecutively to prevent disease buildup. Pro tip: Label trays to track reuse history!
Are Burpee trays better than DIY alternatives like egg cartons?
Burpee trays win for root space and durability. While egg cartons work for short-term starts, Burpee’s deep cells (often 2–3" deep) reduce transplant shock. Plus, they’re reusable and stackable—perfect for small spaces!
Why are my seedlings leggy or falling over in Burpee trays?
Leggy seedlings usually mean too little light or overcrowding. Move trays to a sunny window or grow lights (12–16 hours/day) and thin seedlings if needed. If roots are circling the tray, it’s time to transplant—don’t wait until they’re root-bound!
How do I transition seedlings from Burpee trays to outdoor pots?
Hardening off is key! Gradually expose seedlings to outdoor conditions (5–7 days), starting with 1–2 hours in shade. Water trays the day before transplanting to ease root removal. Use a seedling starter fertilizer post-transplant to help them recover.
Wrapping up and next steps
Starting seeds in Burpee Seed Starting Trays isn’t just a smart choice—it’s a game-changer for healthy, robust seedlings! 🌱 With their optimized root space and drainage, these trays set the stage for thriving plants from day one.
Whether you’re a seasoned gardener or just beginning, this method simplifies the process while maximizing success.
Ready to dive in? Grab your trays, gather your seeds, and start growing! Your future garden will thank you—one sturdy seedling at a time. 🌿✨