
Size
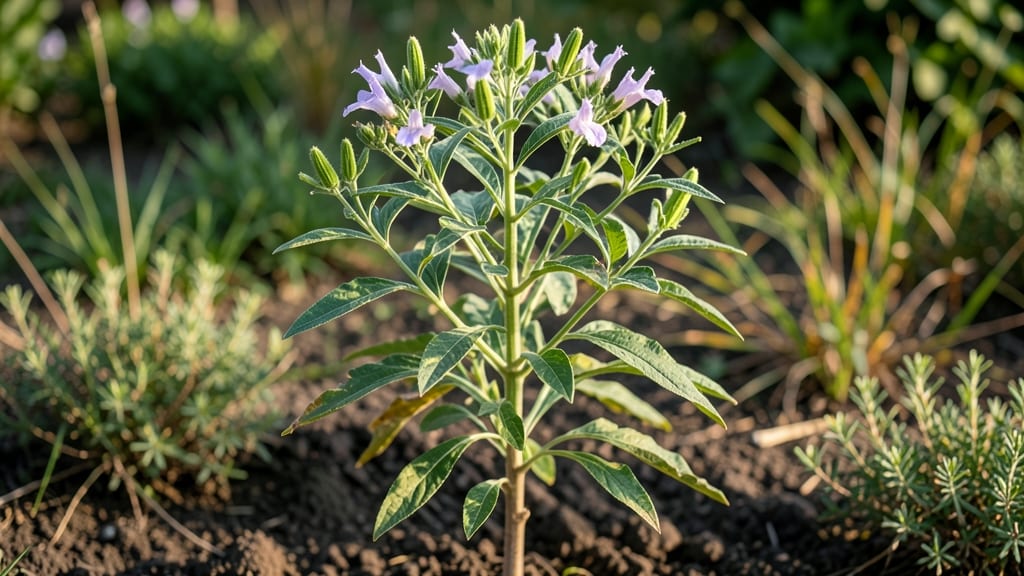
Growing sesame plants from seed is easier than you think—especially when you avoid the frustrating twisty pods that ruin harvests. 🌱 I've grown sesames for years, and the secret lies in warm soil, consistent moisture, and proper spacing.
The plants shoot up fast in summer heat, reaching 3-4 feet tall with delicate white flowers that turn into those prized seeds.
You'll need well-draining soil, full sun (at least 6 hours daily), and patience—sesames thrive in warm climates (zones 7-11) but can be started indoors if you live in cooler areas.
The key is planting seeds ½ inch deep, spacing them 12 inches apart, and keeping soil evenly moist (not soggy). Too much water causes the pods to twist, which is what you're avoiding!
By late summer, you'll see those signature sesame pods forming along the stems. The harvest happens when pods turn yellow and start splitting open—usually around 100-120 days after planting.
Snip them before they twist, then spread them on a towel to dry completely. The seeds inside will be plump and ready for toasting or cooking.
This method works for both garden beds and containers, making it perfect for small spaces. The biggest mistake? Letting the soil dry out or overwatering—both cause those frustrating twisted pods. Stick with this routine, and you'll have a stress-free harvest every season.
📚 In This Guide
- What you need
- Instructions
- Tips and common mistakes
- Wrapping up and next steps
What you need
- ● Sesame seeds: 1–2 lbs (organic, non-GMO preferred for best results). Look for varieties like Bunsi or Til for zero-twist pods!
- ● Seedling trays or pots: 2–3 (6-inch diameter) for starting seeds indoors, or a 10x20-inch raised bed for direct sowing.
- ● Potting mix: 1 bag of well-draining, sterile soil (or a 50/50 mix of garden soil and compost). Sesame plants hate soggy roots!
- ● Fertilizer: Starter fertilizer: 1 tbsp of balanced 10-10-10 per tray.
- ○ Growth booster: 1 cup of compost tea or fish emulsion (optional but recommended for nutrient-rich soil).
- ● Watering can or spray bottle: With a fine rose attachment to avoid disturbing seeds.
- ○ Garden twine or stakes: (Optional) For trellising if growing in cooler climates (sesame prefers warmth!).
- ● Gloves: A pair to protect your hands from prickly stems (trust us, it’s worth it!).
- ● Pruners or scissors: For trimming dead leaves or harvesting pods.
- ● Sunlight access: A sunny spot (6+ hours of direct light daily). Sesame is a sun-worshipper!
- ● Warmth: Ideal soil temp: 70–85°F (21–29°C). Use a heat mat if starting indoors in cool climates.
- ● Patience: Sesame seeds take 70–100 days to mature—plan ahead!
- ● 🌡️ Test your soil pH: Aim for 6.0–7.0 (sesame prefers slightly acidic to neutral).
- ● ✨ Thin seedlings: Space plants 6–12 inches apart to prevent overcrowding.
- ● 🔥 Drought tolerance: Once established, sesame is drought-resistant—water deeply but infrequently.
Step-by-Step instructions for growing sesame plants
Here's how to cultivate sesame with minimal fuss—no tangled pods, just straight, easy harvesting.
🌱 Step 1: Start Seeds Indoors for Early Growth
Sesame thrives in warm soil, so begin seeds 8-10 weeks before your last frost date. Use biodegradable pots filled with seed-starting mix (never garden soil—it's too dense). Plant seeds ½ inch deep and keep them in a warm spot, ideally 75-85°F, for consistent germination.
Water gently after planting, then cover the pots with plastic wrap to retain warmth and moisture. Check daily—you'll see sprouts in 7-14 days. Once seedlings emerge, remove the plastic immediately to prevent fungal growth. Sesame seedlings are delicate, so avoid disturbing them until they develop 2-3 true leaves.
☀️ Step 2: Transplant Outdoors After Warmth Arrives
Move seedlings outdoors only when nighttime temperatures stay above 55°F. Harden them off by placing them outside for 2-3 hours daily over 5-7 days, gradually increasing exposure. Sesame plants need full sun (6+ hours daily), so choose a warm, sunny spot with well-draining soil.
Transplant carefully, burying the stem up to the first set of true leaves. Space plants 12-18 inches apart in rows 18 inches apart to allow airflow and prevent disease. Water deeply after transplanting to help roots establish, then maintain 1 inch of water weekly unless rainfall provides it.
💧 Step 3: Monitor Water and Soil for Zero-Twist Pods
Sesame plants are drought-tolerant but produce better yields with consistent moisture. Water at the base of the plant in the morning to allow foliage to dry quickly, reducing fungal risks. Avoid overhead watering—it can cause leaf diseases and twist pods, which is exactly what we're avoiding.
Watch for signs of stress: wilting or yellowing leaves mean it's time to water. Once plants reach 18-24 inches tall, reduce watering slightly to encourage pod development. Overwatering now leads to weak stems and twisted pods—this is the moment that matters.
✂️ Step 4: Harvest Before Pods Fully Dry
Sesame pods are ready to harvest when they turn light brown and begin cracking open. This usually happens 90-120 days after planting, depending on your climate. Use sharp scissors to cut stems 1-2 inches above the ground to avoid damaging the base for regrowth.
Hang harvested plants upside down in a dry, well-ventilated area for 1-2 weeks to fully dry. Once pods are brittle and seeds rattle inside, gently rub them between your hands to release the seeds. Store in an airtight container in a cool, dark place for up to 6 months.
🌿 Step 5: Prevent Common Mistakes for Smooth Growth
Sesame plants are sensitive to overcrowding, so thin seedlings if they grow too close. If you notice pods twisting, it's usually a sign of uneven watering or poor drainage. Mulch around plants with straw or grass clippings to retain moisture and suppress weeds without smothering roots.
Real talk: sesame plants are finicky about temperature. If nights dip below 50°F, cover plants with frost cloth to protect them. Also, avoid high-nitrogen fertilizers—they promote leafy growth at the expense of seed production. A balanced, low-nitrogen fertilizer applied at planting time is all you need.
Tips & tricks for growing sesame plants
These simple strategies will help you avoid common pitfalls and grow healthy sesame plants with straight, twist-free pods.
Heat Control: In Step 1, maintaining that 75-85°F temperature range is critical for germination. I learned this the hard way—when I let my seedlings sit in a cooler spot, they took 14 days to sprout instead of the expected 7-10 days. Use a seedling heat mat if your home stays below 70°F at night. The warmth mimics tropical conditions where sesame thrives naturally.
Transplanting Technique: When hardening off seedlings in Step 2, I recommend starting with just 1-2 hours on the first day rather than the full 2-3 hours. Gradually increase exposure by 30 minutes each day—this prevents shock that can stunt growth. Also, transplant on a cloudy day to reduce stress from direct sunlight during this sensitive transition.
Watering Wisdom: The key to avoiding twisted pods in Step 3 is consistency. I use a simple trick: water when the top inch of soil feels dry to the touch, but never let the soil become bone-dry. For established plants, I set a timer for every 5-7 days to check moisture levels. Morning watering is non-negotiable—it gives foliage time to dry before evening, preventing fungal issues.
Harvesting Hack: In Step 4, when pods turn light brown and begin cracking, I harvest in batches every 2-3 days to maximize yield. This staggered approach prevents all pods from opening simultaneously. After cutting stems, I bundle them with rubber bands before hanging to dry—this keeps them upright and organized for easier processing later.
Pro Tips for Grow Sesame Seed Plant
- These simple strategies will help you avoid common pitfalls and grow healthy sesame plants with straight, twist-free pods.
- Heat Control: In Step 1, maintaining that 75-85°F temperature range is critical for germination.
- Transplanting Technique: When hardening off seedlings in Step 2, I recommend starting with just 1-2 hours on the first day rather than the full 2-3 hours.
Frequently asked questions
Got questions about growing sesame plants? You’re not alone!
Here are answers to the most common queries to help you cultivate healthy, high-yielding sesame seeds with ease.
How long does it take to grow sesame seeds from planting to harvest?
Sesame plants typically mature in 70–90 days after germination, depending on the variety and climate. Early-maturing varieties (like Tif sesame) may take as little as 60 days, while some tropical types can stretch to 120 days. Warm weather (75–90°F) speeds up growth, so plan your planting schedule accordingly!
When is the best time to plant sesame seeds for maximum yield?
Sesame thrives in warm seasons, so plant after the last frost when soil temperatures reach 65°F+. In most regions, this means late spring to early summer. Avoid planting too early—cool soil slows germination. For tropical climates, align planting with the rainy season to ensure consistent moisture.
Why are my sesame pods twisting or not opening? How do I prevent it?
Twisted pods (a condition called “pod shattering”) often happen due to overcrowding, drought stress, or uneven watering. To prevent it:
- Space plants 12–18 inches apart for airflow.
- Water deeply 2–3 times per week (avoid soggy soil).
- Harvest pods before they fully dry (when they turn yellow/brown but are still pliable).
Can I grow sesame seeds indoors or in containers?
Yes! Sesame is container-friendly if you use pots at least 12 inches deep with drainage holes. Choose a sunny windowsill or grow lights (12+ hours/day). Dwarf varieties like ‘Black Sesame’ work best. Just ensure the pot stays warm—sesame hates cold roots. For indoor growers, prune lower leaves to boost pod production.
What can I do with sesame seeds if my plants don’t produce pods?
Don’t worry—even if pods fail, you can still use the leaves and stems! Young leaves are edible (tastes like spinach) and rich in iron. For stems, chop and compost them or use as mulch. If you’re determined to salvage seeds, try replanting in a warmer spot next time—sesame is light-sensitive and needs full sun!
Wrapping up and next steps
Growing sesame seeds is a rewarding journey that yields nutrient-packed pods with minimal fuss! 🌱 By following the right steps—from soil prep to harvesting—you’ll enjoy a bountiful, twist-free crop in no time. Whether you’re a beginner or seasoned gardener, patience and consistency are your best tools.
Ready to take the next step? Start small with a few plants, experiment with varieties, and share your progress with fellow gardening enthusiasts. Happy growing—your kitchen (and health) will thank you! 🌟