
Lawn
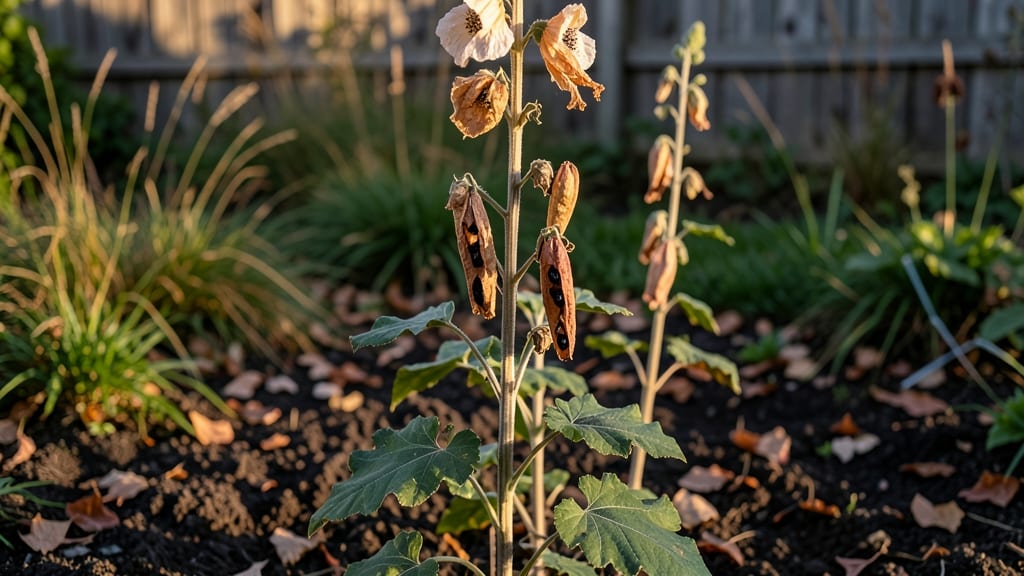
Harvesting hollyhock seed pods turns last year's blooms into next season's garden stars. 🌱 The key is timing—wait until the pods turn from green to a dry, papery brown, usually by late summer or early fall.
I've saved seeds this way for years, and the plants that grow from them are always the hardiest in my garden.
Grab a pair of pruners and snip the pods when they're completely dry but before they split open. Lay them on a screen or paper towel in a dry, shaded spot to finish drying for a few days.
This prevents moisture from ruining your seeds before you even get them in storage. Once fully dry, the pods will open easily, revealing plump, dark seeds ready for planting.
Store your seeds in a cool, dry place like a sealed envelope or small jar. Label them with the variety and harvest date—this helps you keep track of what you've saved.
With proper storage, hollyhock seeds stay viable for up to 5 years, so you'll have a steady supply of plants for years to come.
Watch out for pests like mice or insects that might nibble on your seeds. A sealed container with a tight lid keeps them safe. If you're in a humid climate, consider adding a packet of silica gel to absorb excess moisture.
This simple process turns a summer chore into a sustainable way to fill your garden with hollyhocks for seasons to come.
📚 In This Guide
- What you need
- Instructions
- Tips and common mistakes
- Wrapping up and next steps
What you need
- ● Hollyhock seed pods – Fully mature, dried pods (brown, papery texture, ~3–4 inches long). Harvest at least 10–15 pods for a good seed yield.
- ● Pruning shears or sharp scissors – For cleanly snipping stems without damaging pods.
- ● Paper bags or breathable fabric sacks – 2–3 medium-sized bags (12x15 inches) to store pods while drying.
- ● Newspaper or cardboard – To line a flat surface for drying pods (avoids moisture buildup).
- ● Small wooden spoon or butter knife – For gently prying open dried pods to extract seeds.
- ● Seed-saving envelopes or glass jars – For long-term seed storage (label with harvest year!).
- ● Fine-mesh sieve or colander – To sift out debris from harvested seeds.
- ● Desiccant packets (silica gel) – For extra-dry storage environments.
- ● Notebook & pen – To log pod maturity dates, varieties, or seed traits.
- ● Gloves (nitrile or cotton) – Protects hands from prickly hollyhock stems.
How to harvest hollyhock seed pods for next year's blooms
Here's the simple method I use every fall to collect healthy seeds without losing a single pod to birds or rot.
🌿 Step 1: Identify and Wait for Mature Seed Pods
Hollyhock seed pods mature when they turn from green to tan or brown and begin splitting open along the seams. I wait until at least 50% of the pod is dry—this ensures seeds are fully developed but haven't started scattering. Look for pods that feel lightweight when held in your hand; they should rattle slightly when shaken.
Don't harvest too early—immature seeds won't germinate. I like to check pods on dry, sunny mornings after dew has evaporated. This makes it easier to spot the color change and prevents dampness from encouraging mold. If rain is forecast, collect pods immediately to avoid water damage.
✂️ Step 2: Harvest and Dry the Pods Properly
Use clean, sharp pruning shears to snip the entire seed pod from the stem, leaving about ½ inch of stem attached. This prevents seeds from falling out during handling. Place pods in a paper bag (not plastic—it traps moisture) and label them with the variety name and harvest date.
Spread the pods on a screen or mesh tray in a dry, well-ventilated spot (like a garage or covered porch) for 7-10 days. They need airflow to finish drying completely. Turn them daily to ensure even drying. You'll know they're ready when the pods crack open easily when gently squeezed and the seeds inside look dry and papery (not sticky or shriveled).
🪴 Step 3: Extract and Store Seeds Correctly
Once pods are fully dry, place them in a brown paper bag and gently crush them between your hands to release the seeds. Winnow the seeds by holding the bag 12 inches above a flat surface and shaking it—seeds will fall out while chaff blows away. Repeat until only clean seeds remain.
Store seeds in an airtight envelope with a silica gel packet (to absorb moisture) in a cool, dark place. Hollyhock seeds stay viable for 3-4 years if stored properly. I like to write the harvest year on the envelope so I don't accidentally plant last year's seeds by mistake.
💧 Step 4: Prep Seeds for Spring Planting (Optional)
Hollyhock seeds benefit from stratification—a cold treatment that mimics winter and breaks dormancy. Place seeds in a ziplock bag with damp peat moss (just moist, not soggy), seal it, and refrigerate for 4-6 weeks. Check weekly to ensure the moss stays damp but not wet.
After stratification, sow seeds ¼ inch deep in well-draining soil. Keep them moist until germination, which typically occurs in 10-14 days. If you skip stratification, seeds may take 3-4 weeks to sprout. Real talk: I've had luck planting untreated seeds, but stratification gives me stronger, more reliable seedlings.
Tips & tricks for perfect hollyhock seed pod harvesting
A few simple tricks that'll make your seed-saving process smoother and more reliable every time.
Timing is Everything: I can't stress enough how important it is to harvest when pods are exactly at that 50% dry stage in Step 1. If you wait too long, seeds scatter—if you go too early, they won't germinate. Here's my trick: Harvest pods that are 60-70% dry rather than waiting for 100%. This gives you a little buffer while still ensuring viability. I check pods every 2-3 days during peak harvest season to catch that perfect window.
Harvesting Technique: When you're using pruning shears in Step 2, make your cuts at a slight angle just above a leaf node. This creates a natural barrier that helps prevent moisture from entering the stem stump, reducing rot risk. Also, work during the coolest part of the day—morning harvests mean less stress on the plants and less chance of pods splitting open prematurely from heat.
Drying Strategy: For the 7-10 day drying period in Step 2, I've found that placing pods on a mesh tray in a spot with indirect sunlight works best. Direct sun can cause uneven drying, while complete darkness slows the process. If your garage gets humid, prop open a window or use a small fan to maintain airflow. You'll know pods are ready when they make a crisp sound when tapped together—like dry corn husks.
Storage Wisdom: When storing seeds in Step 3, I double up on moisture protection by placing the silica gel packet inside a small zip-top bag before sealing it in the airtight envelope. This creates an extra moisture barrier. I also date my envelopes with a permanent marker on the outside—right next to the variety name—so I can see at a glance how old the seeds are without opening them.
Pro Tips for Hollyhocks Seed Pods
- A few simple tricks that'll make your seed-saving process smoother and more reliable every time.
- Timing is Everything: I can't stress enough how important it is to harvest when pods are exactly at that 50% dry stag...
- Harvesting Technique: When you're using pruning shears in Step 2, make your cuts at a slight angle just above a leaf ...
Frequently asked questions
Got questions about harvesting hollyhock seed pods?
You’re not alone! Here are answers to the most common queries to help you gather viable seeds with ease—no stress, just success.
When is the best time to harvest hollyhock seed pods?
Harvest seed pods when they turn dry, brown, and papery—usually late summer to early fall (August–October in most climates). Avoid harvesting too early (green pods) or too late (bursting pods), as seeds may not germinate. Check pods daily for optimal timing!
How do I know if the seeds inside are still viable?
Viable hollyhock seeds are plump, dark brown, and firm to the touch. If they’re shriveled, light-colored, or crumbly, they’ve likely lost viability. Store seeds in a cool, dry place (like a paper envelope) for up to 2 years for best results.
What should I do if rain ruins my seed pods before harvest?
Don’t worry! If pods swell or split from rain, pick them immediately and spread them on a tray to dry indoors. Remove any moldy or damp seeds to prevent rot. Rain can actually speed up the drying process—just act fast to salvage your seeds!
Can I grow hollyhocks from store-bought seeds instead of harvesting my own?
Store-bought seeds work fine, but home-harvested seeds often yield plants more resistant to your local pests/diseases. If using store-bought, choose heirloom or open-pollinated varieties for better germination. Just soak seeds overnight in warm water to soften hard coats.
Why are my seed pods getting eaten by pests before I can harvest them?
Common culprits include slugs, snails, or seed-eating beetles. Protect pods with row covers or neem oil spray. For beetles, handpick them early in the morning. If slugs are the issue, set up beer traps or use organic slug bait around the base of plants.
Wrapping up and next steps
Harvesting hollyhocks seed pods doesn’t have to be a tricky task—with the right timing, tools, and techniques, you can enjoy a steady supply of viable seeds all year round! 🌱 Whether you’re saving seeds for next season or sharing them with fellow gardeners, these tips make the process simple and rewarding.
Now that you’re equipped with the knowledge, why not take the next step? Grab your pruners, head to your garden, and start collecting those seed pods before they burst open. Happy gardening—your future blooms will thank you! 🌸