
Lawn
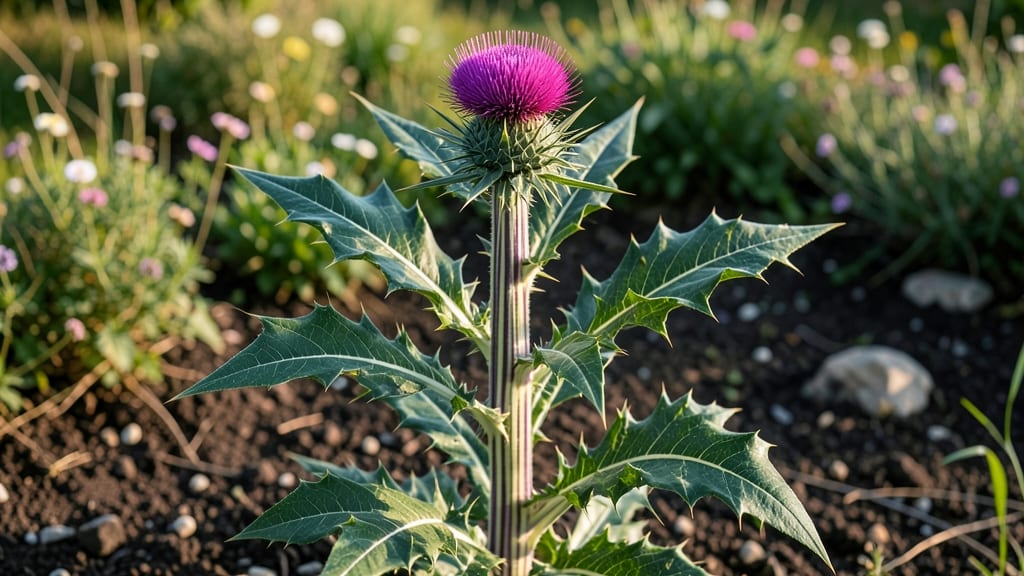
Growing milk thistle from seed is easier than you think—especially when you let those spiky blooms catch the sun. 🌱 I've watched these silvery-green rosettes push through soil in just 10 days with the right setup, and they thrive in spots where other plants struggle.
The key is patience and a sunny window or well-drained bed. You'll need basic supplies: fresh seeds, a shallow tray or small pots, and soil that drains well (think sandy loam or a mix with perlite). Scatter seeds lightly on top—no need to bury them—and keep the soil barely moist.
These plants love full sun but tolerate partial shade, making them perfect for balconies or garden edges. By late summer, you'll see those iconic purple thistles shooting up, attracting bees and butterflies while adding striking texture to your space.
The rosettes stay edible (yes, really!) and the flowers dry beautifully for arrangements. Best of all, milk thistle self-seeds happily, so once established, you'll have these tough, drought-resistant plants popping up for years. Here's how to get started without the fuss!"
📚 In This Guide
- What you need
- Instructions
- Tips and common mistakes
- Wrapping up and next steps
What you need
- ● Milk thistle seeds (Silybum marianum) – 1–2 packets (50–100 seeds). Choose organic, non-GMO seeds for the best results.
- ● Seed-starting soil mix – 1 small tray (10x20 inches) or 4-inch pots. Use a lightweight, well-draining potting mix (e.g., Black Gold Seedling Mix or Miracle-Gro Seed Starting Potting Mix).
- ● Containers – 4–6 biodegradable pots (2–3 inches deep) or a seed tray with drainage holes. Alternatively, repurpose small yogurt cups or egg cartons.
- ● Drainage tray or saucer – 1 per container. Ensures excess water doesn’t drown your seeds.
- ● Spray bottle – 1 (500–1,000 mL). For gentle watering without disturbing seeds.
- ● Clear plastic wrap or humidity dome – 1 sheet or lid. Creates a mini greenhouse to retain moisture.
- ○ Gloves (optional but recommended) – 1 pair. Milk thistle has spiky leaves—protect your hands!
- ● Tweezers or toothpick – 1 pair. Helps place tiny seeds precisely.
- ● Grow lights or sunny windowsill – 6–8 hours of indirect light daily. A LED grow light (12–15W) works if natural light is limited.
- ○ Thermometer (optional) – 1. Ideal germination temp: 60–75°F (15–24°C).
- ● Fertilizer (after germination) – Balanced liquid fertilizer (5-5-5 or 10-10-10). Dilute to half-strength when seedlings appear.
Step-by-step guide to germinating milk thistle seeds
Here's how I turn tiny milk thistle seeds into sturdy seedlings—no fancy equipment needed.
🌱 Step 1: Soak Seeds for 24 Hours
Milk thistle seeds have tough outer shells that need a good soak to soften. Place 4 seeds (since you're starting 4 plants) in a small bowl and cover them with warm water at about 70°F. Let them soak overnight—you'll know they're ready when the water turns slightly cloudy from the seed oils.
Don't skip this step. The soaking breaks dormancy and speeds up germination by 3-5 days. I like to label my bowl with the date so I don't forget to check them the next morning. After 24 hours, drain the water and let the seeds sit on a paper towel for 1 hour to dry slightly before planting.
🪴 Step 2: Prepare Lightweight Planting Mix
Fill 4 small pots (3-4 inches wide) with a mix of 50% potting soil and 50% perlite or sand. This airy blend prevents the seeds from rotting, which is their biggest threat. Press the mix gently into the pots so it's firm but not packed down—you want roots to push through easily.
Make a tiny hole with your finger about ¼ inch deep in each pot. Milk thistle seeds are small, so I use a toothpick to place just one seed in each hole. Cover it with a thin layer of the same mix, patting lightly to secure it. Label each pot so you don't mix up your seedlings later.
☀️ Step 3: Provide Warmth and Indirect Light
Place the pots in a warm spot with bright, indirect light—think a south-facing window with sheer curtains. Milk thistle seeds germinate best at 75-80°F, so if your home runs cooler, place them on a seedling heat mat. You should see tiny sprouts in 7-14 days, though some stubborn seeds may take up to 3 weeks.
Keep the soil consistently moist but never soggy. The top inch should feel damp to the touch. I use a spray bottle to water gently—direct streams can wash away the tiny seedlings. Once they've sprouted, move them to a slightly sunnier spot, but avoid harsh afternoon sun until they're established.
🌿 Step 4: Thin and Harden Off Seedlings
When seedlings reach 2 inches tall and have their first true leaves (not the initial seed leaves), it's time to thin. If multiple sprouts emerged in a pot, snip all but the strongest one at the base with clean scissors. This prevents overcrowding and gives the remaining plant room to grow.
Start hardening off your seedlings by placing them outside in a sheltered spot for 1 hour on the first day. Gradually increase their time outside over 5-7 days, until they can handle full sun and cooler temperatures. Milk thistle seedlings are tough once established, but they need this gradual transition to avoid shock.
⏰ Step 5: Transplant to Permanent Home
After 4-6 weeks of growth, your milk thistle seedlings will be ready to move outdoors. Choose a sunny spot with well-draining soil—they thrive in full sun and dry conditions. Dig a hole twice as wide as the root ball but only as deep as the pot. Gently remove the seedling, keeping the soil intact around the roots, and place it in the hole.
Water deeply after transplanting to help the roots settle. Milk thistle is drought-tolerant once established, but young plants need consistent moisture for the first 2 weeks. You'll know they're happy when they start sending up their distinctive spiky leaves—just don't worry if growth seems slow at first.
Tips & tricks for perfect milk thistle seed germination
Here's what I learned after watching my first batch of milk thistle seeds struggle—don't make my mistakes!
Soaking Secret: The 24-hour soak at 70°F is non-negotiable for breaking dormancy, but here's the trick: use filtered or room-temperature water instead of tap water. Chlorine and fluoride can inhibit germination. If you forget to label your bowl, wrap it in clear tape with the date—this prevents over-soaking, which can cause mold. After draining, pat the seeds dry on a paper towel for exactly that 1 hour—any longer and they'll dry out too much before planting.
Planting Mix Pro Tip: For that 50% potting soil/50% perlite or sand mix, I recommend sterilizing both components first. Microwave the potting soil in a sealed container for 2 minutes to kill any pathogens, and toast perlite/sand in a dry skillet for 5 minutes. This prevents damping-off disease, which is milk thistle's biggest seedling killer. When pressing the mix into pots, aim for firmness like a well-packed snowball—this gives roots something to grip without being too dense.
Lighting Strategy: That 75-80°F temperature range in Step 3 is crucial, but lighting can make or break success. If your south-facing window gets harsh afternoon sun, place a sheer curtain between the glass and your seedlings. Direct sun at this early stage can scorch the delicate sprouts. I use a small LED grow light on a timer for 12 hours daily if natural light is insufficient—just keep it 6 inches above the pots to prevent heat damage.
Harden Off Gradually: When you start the 5-7 day hardening process, increase outdoor time by only 30 minutes per day max. Milk thistle seedlings are tough, but sudden temperature swings can cause transplant shock. On cloudy days, extend outdoor time slightly—overcast conditions are gentler on young plants. Watch for wilting during the first few hours outside; if you see this, bring them back in immediately and try again the next day.
Pro Tips for Milk Seed Thistle
- Here's what I learned after watching my first batch of milk thistle seeds struggle—don't make my mistakes!
- Soaking Secret: The 24-hour soak at 70°F is non-negotiable for breaking dormancy, but here's the trick: use filtered ...
- Planting Mix Pro Tip: For that 50% potting soil/50% perlite or sand mix, I recommend sterilizing both components firs...
Frequently asked questions
Got questions about growing milk thistle seeds?
You’re not alone! Here are answers to the most common concerns—so you can grow this striking, low-maintenance plant with confidence.
How long does it take for milk thistle seeds to germinate?
Milk thistle seeds typically sprout within 10–30 days under ideal conditions (warmth, consistent moisture, and sunlight). For faster results, soak seeds in warm water for 24 hours before planting. Patience is key—these seeds are slow starters but worth the wait!
Do milk thistle seeds need light to germinate?
Yes! Unlike some seeds, milk thistle thrives with light exposure during germination. Plant them shallowly (¼ inch deep) in well-draining soil and place the tray in a sunny windowsill or under grow lights. Avoid burying them too deep—they need sunlight to break dormancy.
Can I grow milk thistle indoors year-round?
Milk thistle adapts well to indoor growing, especially in sunny spots like south-facing windows. Use a self-watering pot to maintain moisture, and supplement with a grow light (12–14 hours/day) if natural light is limited. Just be mindful of its height—it can reach 5–6 feet indoors!
What should I do if my milk thistle seeds rot instead of sprouting?
Overwatering or poor drainage is usually the culprit. Let the soil dry slightly between waterings (keep it moist but not soggy), and ensure pots have drainage holes. If seeds rot, try again with fresh seeds and a 50/50 mix of potting soil and perlite for better airflow.
Are there alternatives if milk thistle seeds are hard to find?
If you’re craving a similar look, try globe thistle (Echinops) or perennial sunflower (Helianthus). Both are drought-tolerant, pollinator-friendly, and easier to source. For a milky-white floral contrast, Russian sage (Perovskia) is another great option!
Wrapping up and next steps
Growing milk thistle seed in your sunlit windowsill isn’t just rewarding—it’s a celebration of nature’s resilience! With the right soil, patience, and a little warmth, you’ll soon be nurturing these striking, drought-tolerant plants that thrive in even the toughest conditions.
Whether you’re aiming for a pollinator-friendly garden or simply adding texture to your space, your efforts will pay off in vibrant blooms and eco-friendly beauty.
Ready to dive deeper? Start small—try a single pot to perfect your technique, then expand your thriving milk thistle patch. Happy growing! 🌱✨