
Lawn
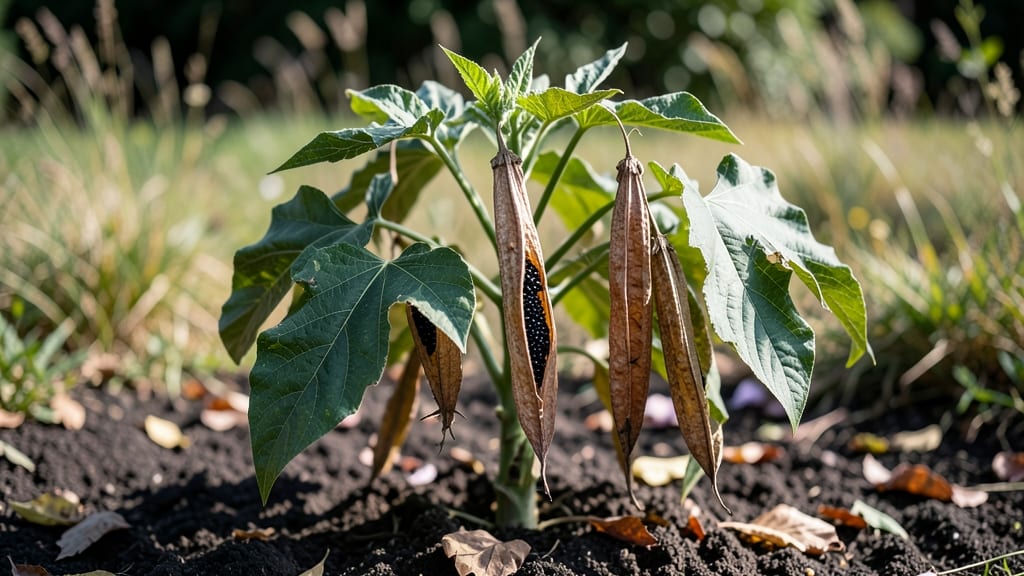
Moonflower datura seed pods hold the key to next year’s dreamy white blooms—but only if you handle them right. 🌙 These spiky, lantern-shaped pods contain seeds that need a little winter magic to break dormancy, and I’ve cracked the code after years of trial and error.
The trick is cold stratification: after harvesting mature pods (when they turn brown and papery), you’ll let them dry completely, then store them in a sealed bag with damp peat moss in the fridge for 8-12 weeks.
This mimics nature’s winter chill, tricking the seeds into thinking spring has arrived.
By spring, you’ll have plump, viable seeds ready to plant—no more waiting for store-bought varieties that never match the moonlit drama of your original plant. Safety note: All datura parts are toxic; wear gloves when handling and keep away from pets/kids.
Works for both gardeners with full sun patches and those growing in containers. Let’s turn those pods into next year’s centerpiece blooms!
📚 In This Guide
- What you need
- Instructions
- Tips and common mistakes
- Wrapping up and next steps
What you need
- ● Moonflower datura seed pods: 10-20 mature, fully dried pods (harvested in late fall or early winter). Ensure they’re brown and slightly papery.
- ● Paper towels or coffee filters: 2-3 sheets (for moisture control).
- ● Small paper bags or breathable mesh bags: 2-4 bags (to hold seeds and allow airflow).
- ● Plastic storage container with lid: 1 (e.g., a Tupperware or seed-starting tray with drainage holes).
- ● Potting mix: 1 small bag (sterile, seed-starting blend).
- ● Spray bottle with water: 1 (for gentle misting).
- ● Permanent marker or labels: 1 (to mark dates/containers).
- ● Refrigerator or cold stratification setup: Access to a fridge (34–40°F / 1–4°C) or a basement with consistent cool temps.
- ● Seedling heat mat: 1 (to speed up germination post-stratification).
- ● Humidity dome or plastic wrap: 1 (to retain moisture during germination).
- ● Grow lights: 1-2 (if starting seeds indoors before transplanting).
- ● Notebook or app: 1 (to track stratification dates and progress).
How to preserve moonflower datura seed pods for next season
Here’s my foolproof method for saving those striking seed pods until spring—no guesswork, just reliable blooms.
🌿 Step 1: Harvest Mature Seed Pods at Peak Ripeness
Wait until the pods turn from green to a dry, papery brown—this signals they’re fully mature and ready for collection. I like to harvest them on a dry morning when the pods are crisp to the touch. Use clean pruning shears to snip the stems, leaving about ½ inch of stem attached to each pod.
If you miss the perfect window and pods open prematurely, scatter any remaining seeds immediately—they’ll sprout within days. Just don’t let them dry out completely on the plant; that’s when they lose viability.
🪴 Step 2: Dry and Store Pods Properly
Spread the harvested pods in a single layer on a clean, dry surface in a well-ventilated area. Keep them out of direct sunlight to prevent overheating, which can crack the pods and ruin the seeds inside. I use a mesh screen or an old window screen propped up on a table—airflow is everything here.
Check the pods daily and gently shake them. When they rattle loudly (meaning the seeds have fully dried inside), they’re ready for storage. Store them in a paper envelope or small breathable bag in a cool, dark place like a pantry or seed drawer.
⏰ Step 3: Cold-Stratify for Maximum Germination
Moonflower seeds need a 6-8 week cold period to break dormancy—this mimics winter’s natural cycle. Place the dried pods in a sealed plastic bag with a damp paper towel (just enough moisture to keep things damp, not soggy). I tuck them into the vegetable crisper of my fridge, where temperatures stay steady at 35-40°F.
Check the pods every 2 weeks to ensure they’re not moldy or damp. If you see any signs of spoilage, remove those pods immediately—moisture is the enemy here. After 8 weeks, your seeds will be primed and ready for spring planting.
🌱 Step 4: Plant Stratified Seeds in Spring
Once temperatures warm up, sow the seeds directly in the garden or in small pots filled with well-draining soil. Press them just ¼ inch deep—moonflowers hate being buried too deeply. Water gently but thoroughly, keeping the soil consistently moist until germination, which usually takes 10-20 days.
Here’s the thing—moonflowers grow fast, so don’t overcrowd them. Space seeds 18-24 inches apart if planting directly in the ground. Thin seedlings to the strongest one per spot, as overcrowding leads to weak stems and fewer blooms.
☀️ Step 5: Provide Ideal Growing Conditions
Moonflowers thrive in full sun, so choose a spot that gets at least 6-8 hours of direct sunlight daily. They’re drought-tolerant once established, but young seedlings need consistent moisture. Water deeply once a week unless you’ve had heavy rain—let the top 2 inches of soil dry out between waterings.
Watch for those first true leaves to appear—this is your signal that the seeds have successfully sprouted. Once the plants reach 6 inches tall, they’ll start growing rapidly, so keep an eye out for pests like aphids or spider mites. A quick spray of water usually does the trick, but severe infestations may need neem oil.
Tips & tricks for perfect moonflower seed pod preservation
Here's what I've learned after years of saving these stunning pods—these little details make all the difference between seeds that sprout and ones that fail.
Harvest Timing is Everything: The pods need to be completely dry and papery brown, not just slightly brown with green streaks. I test by gently squeezing them—if they feel crisp like tissue paper, they're ready. Harvesting too early means immature seeds that won't germinate, while waiting too long risks them splitting open and losing viability. The crispness test is your best indicator of perfect ripeness.
Drying Strategy: Never stack the pods during drying—this creates trapped moisture that can cause mold. I use a mesh screen elevated on a table to allow airflow from all sides. If you notice any pods developing condensation or feeling damp after a few days, spread them out again immediately. Proper drying at room temperature (around 70-75°F) typically takes 5-7 days, but humidity levels can affect this.
Cold Stratification Secrets: The 6-8 week cold period is non-negotiable for moonflower seeds, but the fridge's vegetable crisper isn't the only option. You can also use a seed refrigerator set to 35-40°F, or even bury the sealed bags in a snowbank outdoors if you have one. The key is consistent cold—fluctuating temperatures can break dormancy prematurely. I mark my calendar 8 weeks out to remind myself when to check for readiness.
Planting Depth Matters: Those ¼ inch planting instructions are critical—moonflowers have very shallow root systems. Planting too deep will smother the seeds, while planting too shallow may expose them to drying winds. I use my finger to make small dimples in the soil, then place one seed per dimple and cover lightly. A light misting with water afterward helps settle the soil without disturbing the seeds.
Pro Tips for Moonflower Datura Seed Pods
- Here's what I've learned after years of saving these stunning pods—these little details make all the difference betwe...
- Harvest Timing is Everything: The pods need to be completely dry and papery brown, not just slightly brown with green...
- Drying Strategy: Never stack the pods during drying—this creates trapped moisture that can cause mold. I use a mesh s...
Frequently asked questions
about moonflower datura seed pods—because even the most patient gardeners have burning questions! Here are the answers to the most common ones.Are moonflower datura seed pods easy to harvest?
Yes! Once the pods turn brown and dry (usually late summer to fall), simply twist or snip them open. Wear gloves—datura seeds are toxic—and collect them in a paper bag for drying. Avoid handling them when wet, as they’re slippery and can stain!
How long do moonflower datura seeds stay viable after cold stratification?
Cold-stratified datura seeds typically retain viability for 1–2 years if stored in a cool, dry place (like a sealed container in the fridge). For best results, plant them within 6 months of stratification. If germination slows, try soaking seeds in warm water for 12 hours before replanting.
Can I skip cold stratification for faster germination?
Cold stratification boosts germination rates for datura, but you can try direct sowing in warm soil (70°F+). However, expect slower, less consistent results. For reliable blooms, 30–60 days of cold treatment (moist paper towel in the fridge) is worth it!
What do I do if my moonflower datura seeds won’t germinate?
Try these fixes:
- Check seed freshness: Older seeds may need scarification (lightly nick the shell with sandpaper).
- Adjust moisture: Keep soil damp but not soggy—datura hates waterlogged roots.
- Test light needs: Some varieties prefer indirect light during germination.
- Patience! Datura can take 2–4 weeks to sprout.
Are moonflower datura seed pods safe for wildlife?
No—proceed with caution!
While the flowers attract pollinators, the seeds and pods are toxic to humans, pets, and wildlife (especially birds). If you have curious critters, harvest pods promptly and dispose of them in sealed trash. Plant datura in contained areas away from kids or pets.
Wrapping up and next steps
Moonflower datura seed pods offer a fascinating way to extend your garden’s beauty into next season—if you master cold stratification! By following the right steps, you’ll unlock vibrant blooms that thrive with minimal effort.
Whether you’re a seasoned gardener or just starting out, this process is a rewarding way to save seeds, reduce costs, and enjoy nature’s magic year after year.
Ready to try? Grab your seed pods, gather your supplies, and start experimenting! Your future moonflowers will thank you—🌙✨