
Propagation
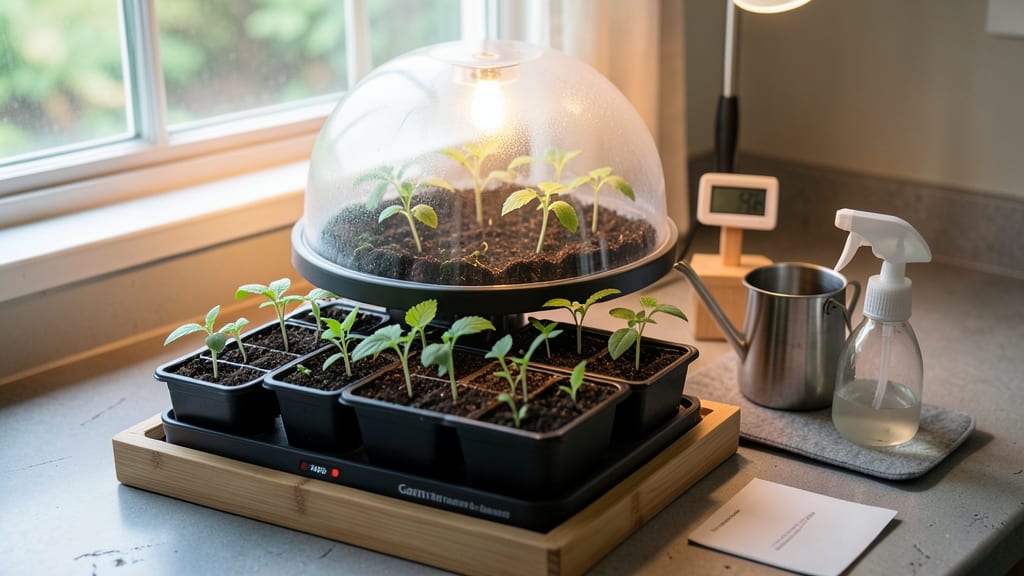
A heat mat for seed germination cuts your waiting time in half—sprouts appear in 7 days instead of weeks. 🌱 I used one last spring and went from skeptical to obsessed after watching my pepper and tomato seeds break through the soil like racehorses.
The secret? Mimicking the warmth of a forest floor or compost pile, which triggers seeds to wake up and grow.
You’ll need a heat mat (any size works), seed trays, a thermometer, and your favorite seeds—especially slow starters like peppers, eggplants, or heirloom tomatoes. Set the mat to 75-85°F for most seeds, and keep it consistently moist (not soggy).
The payoff? Faster germination, stronger seedlings, and a head start on the growing season that store-bought transplants can’t match.
Once your seeds sprout, you’ll notice thicker stems and darker green leaves—signs of vigorous growth. The mat works best for 2-3 weeks until seedlings develop their second set of true leaves.
After that, they’re ready to graduate to natural light, where they’ll keep thriving with the confidence of a head start.
Common mistakes? Overwatering (which causes rot) or letting the mat dry out (which stalls germination). Pro tip: Place a humidity dome over your trays to lock in moisture and warmth. This method works for any seed, but it’s especially game-changing for finicky varieties that struggle in cool soil.
📚 In This Guide
- What you need
- Instructions
- Tips and common mistakes
- Wrapping up and next steps
What you need
- ● Heat mat: A 100-150W electric heat mat (12"x24" or larger for small batches; adjust size for bigger projects). Look for one with an adjustable thermostat (ideal range: 75–85°F).
- ● Seed trays or pots: Shallow trays with drainage holes (e.g., 10"x20" plastic trays) or small pots (3–4" diameter) for individual seeds.
- ● Germination medium: Peat pellets (1–2" diameter) or
- ● Seed starting mix (sterile, well-draining potting soil blend).
- ● Seeds: Fresh, high-quality seeds (check packet for specific germination temps).
- ● Spray bottle (with water) for gentle hydration.
- ○ Plastic wrap or humidity dome: To retain moisture (optional but recommended for humidity-loving seeds like lettuce or basil).
- ● Thermometer: A small digital probe thermometer to monitor heat mat temperature (accuracy within ±1°F).
- ● Scissors or knife (for cutting plastic wrap or peat pellets).
- ● Tweezers (for delicate seed placement).
- ● Labeling tags (to track seed varieties).
- ● Extension cord (if your heat mat lacks a built-in plug).
- ○ Fan (optional): For gentle airflow if humidity gets too high.
- ○ Second heat mat (optional): For larger setups or backup.
Step-by-Step instructions for using a heat mat to germinate seeds
Here's how to harness consistent warmth for faster, stronger seed starts every time.
🌱 Step 1: Select the Right Heat Mat and Position It Properly
Choose a heat mat designed for seed starting—typically a 4-6 inch wide mat that fits under your seed trays. I prefer 10-15 watt mats for standard seedling trays, as they maintain a steady 75-85°F range without overheating. Place the mat on a flat, stable surface like a shelf or countertop, ensuring it has space for air circulation on all sides.
Never cover the mat with plastic or foil—this traps excess heat and can scorch seeds. Instead, position your seed trays directly on top, making sure the mat's warmth reaches the soil evenly. For larger setups, I use a thermometer probe inserted into the soil to monitor temperatures in real time.
💧 Step 2: Prepare Your Seeds and Soil for Optimal Germination
Fill your seed trays with moistened seed-starting mix (never garden soil—it's too dense and may harbor pathogens). Press the mix down lightly so it's firm but not compacted. I like to water the mix until it's damp but not soggy, then let it sit for 10-15 minutes to ensure even moisture distribution.
Sow seeds at the correct depth—usually twice the seed's diameter—and cover lightly with additional mix. Place the tray on the heat mat immediately after sowing. The warmth will encourage seeds to germinate 2-3 days faster than at room temperature. Watch for condensation on the tray's underside—this is a good sign the mat is working effectively.
☀️ Step 3: Maintain Consistent Warmth and Monitor Daily
Keep the heat mat plugged in 24/7 until seeds germinate. Most seeds benefit from constant warmth, but some (like tomatoes and peppers) may need slightly cooler nights—check your seed packet for specifics. I set a reminder to check the soil moisture every 2-3 days—overwatering is the biggest mistake here.
Once seeds sprout, remove the tray from the heat mat immediately. Seedlings are sensitive to sudden temperature changes, and continued warmth at this stage can cause damping-off (a fungal disease that collapses stems). You'll know it's time when 50% of seeds have sprouted—usually within 5-10 days for fast germinators like lettuce or 10-14 days for slower ones like basil.
⏰ Step 4: Transition to Grow Lights and Normal Care
Move the newly sprouted seedlings to a grow light setup (14-16 hours of light daily) and place them in a spot where temperatures stay between 65-75°F. I like to keep them under lights for 7-10 days before introducing them to natural light, gradually increasing exposure to prevent shock.
Thin seedlings if necessary, keeping the strongest 2-3 plants per cell. Avoid disturbing the roots—this is where many gardeners lose their early progress. Within 2-3 weeks, you'll have sturdy seedlings ready for transplanting, all thanks to that initial warmth boost.
Tips & tricks for perfect heat mat germination
Took me years of trial-and-error to nail these heat mat secrets—now you can skip the guesswork and get stronger seedlings faster.
Temperature Precision: That 75-85°F range is non-negotiable for most seeds, but here's the thing: different seeds have different sweet spots. Lettuce thrives at the lower end (closer to 75°F), while tomatoes and peppers prefer the upper range (80-85°F). If you're growing multiple varieties, use a thermometer probe to monitor each tray individually—some seeds will bolt or develop leggy stems if temperatures stray too far from their ideal.
Soil Moisture Secret: The 10-15 minute wait after watering in Step 2 isn't just about even moisture—it's about preventing condensation buildup. Too much moisture in the air around your seeds creates the perfect environment for mold. I like to place trays on a wire rack over a shallow tray of water to maintain humidity without drowning the soil. This keeps the environment just right for germination while preventing that dreaded fuzzy mold growth.
Germination Timing: Those 5-10 days for fast germinators like lettuce might seem quick, but here's what nobody tells you: the first 24 hours are critical. If your seeds haven't sprouted within that time, they're not coming. Don't leave trays on the heat mat indefinitely hoping for miracles—remove unsprouted seeds after 48 hours and start fresh. The heat mat works wonders for viable seeds, but it won't revive dead ones.
Transition Strategy: Moving seedlings from the 75-85°F heat mat to 65-75°F grow lights is where most people mess up. I recommend a gradual transition: place the tray under lights for 2 hours on day 1, then increase by 2 hours daily. This mimics natural daylight changes and prevents shock. Also, keep the lights 2-3 inches above seedlings at first—they'll grow toward the light, creating stronger stems.
Pro Tips for Heat Mat For Seed Germination
- Took me years of trial-and-error to nail these heat mat secrets—now you can skip the guesswork and get stronger seedl...
- Temperature Precision: That 75-85°F range is non-negotiable for most seeds, but here's the thing: different seeds hav...
- Soil Moisture Secret: The 10-15 minute wait after watering in Step 2 isn't just about even moisture—it's about preven...
Frequently asked questions
Got questions about using a heat mat for seed germination?
You’re not alone! Here are some of the most common concerns—and their straightforward answers—to help you grow with confidence.
How warm should my heat mat get for germination?
Aim for a consistent 70–85°F (21–29°C) range, depending on the seed type. Most vegetables and herbs thrive at 75–80°F (24–27°C). Use a thermometer to monitor—too hot (above 90°F/32°C) can scorch seeds, while too cool slows sprouting. Adjust settings or add insulation if needed!
How long does it take to see sprouts with a heat mat?
With a heat mat, you’ll often see sprouts in 3–7 days—half the time of standard germination! Fast-germinating seeds (like radishes or beans) may pop up in 2–4 days, while slower ones (e.g., tomatoes) take 5–10 days. Patience is key, but warmth speeds up the process dramatically!
Can I use a heat mat without a seed tray or propagator?
Yes, but with caution! Place the heat mat on a non-conductive surface (like a wooden board or insulated tray) to avoid overheating your work area. For best results, pair it with a humidity dome or clear lid to trap moisture. If using directly on soil, keep it no thicker than 1–2 inches to prevent uneven heat.
What if my seeds aren’t germinating even with the heat mat?
Check these 3 culprits first:
- Moisture: Keep soil consistently damp (not soggy). Mist lightly if the top layer dries.
- Depth: Plant seeds at the correct depth (usually 2x their width). Too deep = no light; too shallow = drying out.
- Seed viability: Test old seeds by soaking a few in water—if they sink, they’re likely good!
Is a heat mat worth it for small-scale germination?
For small batches (under 50 seeds), a heat mat is a game-changer—it’s affordable, energy-efficient, and cuts waiting time. If you’re growing high-value crops (like heirloom tomatoes or peppers) or dealing with cool climates, the investment pays off fast. For larger setups, consider a seedling heat mat with built-in thermostat for precision.
Wrapping up and next steps
Ready to unlock the secret to faster, stronger seedlings? A heat mat for seed germination is your ticket to success—giving delicate sprouts the warmth they crave to break through soil in just 7 days!
With the right setup, patience, and a little extra care, you’re well on your way to a thriving garden. 🌱
Now that you’re armed with the knowledge, take the next step—grab your seeds, set up that heat mat, and watch your green thumb grow! Whether you’re a beginner or a seasoned gardener, every sprout starts with warmth and confidence. Happy planting! 🌟