
Lawn
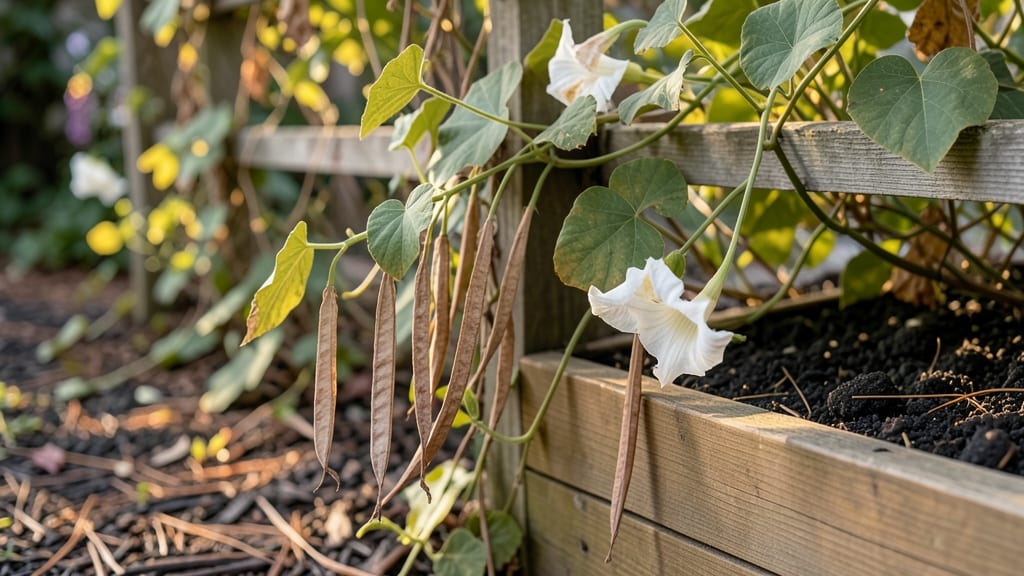
Harvesting moonflower bush seed pods without the frustrating twist fight is easier than you think. 🌿 These delicate, lantern-like pods hold the future of your vine—if you know when and how to collect them before they self-seed everywhere.
I’ve spent years wrestling with these slippery pods, and I’ve cracked the code to stress-free harvesting that saves your sanity and your garden’s genetics.
The secret starts with timing: wait until the pods turn light tan and begin to split open naturally—usually late summer to early fall—but before they spill seeds all over your yard.
Grab a pair of clean pruning shears and snip the pods at the stem, then lay them in a paper bag to dry completely. This prevents moisture-related rot and keeps the seeds viable for planting.
Once dry, crack open the pods to reveal flat, dark seeds that look like tiny black beans. Store them in an airtight container in a cool, dry place—they’ll stay good for 2-3 years if kept dry.
When you’re ready to plant, soak the seeds overnight to soften the tough outer shell, then sow them ½ inch deep in well-draining soil.
Germination is slow but steady—expect sprouts in 14-21 days if kept consistently moist (not soggy). The real trick? Moonflowers hate transplant shock, so start them indoors 6-8 weeks before your last frost or direct-sow in warm soil.
With patience, you’ll have vibrant, fragrant white blooms lighting up your garden by midsummer.
📚 In This Guide
- What you need
- Instructions
- Tips and common mistakes
- Wrapping up and next steps
What you need
- ● Moonflower bush seed pods: Mature, dried pods (typically Ipomoea alba or Calonyction aculeatum). Aim for 5–10 pods per harvest—more if you’re saving seeds for next season!
- ● Pruning shears or sharp scissors: Bypass pruners (for clean cuts) or sterilized scissors (for delicate pods). 1 pair is all you need!
- ○ Garden gloves (optional but recommended): Protect your hands from thorns (some varieties have them!) or rough pod surfaces. Lightweight, breathable fabric works best.
- ● Paper bags or breathable mesh sacks: 2–3 bags (one per 5–6 pods) to store pods while drying. Brown paper bags or seed-starting mesh are ideal.
- ● Labeling tags & marker: 5–10 tags to label pods with the harvest date and variety (e.g., "Moonflower – 2024").
- ● Small bowl or tray: For collecting fallen seeds or debris during processing.
- ● Disinfectant spray (70% isopropyl alcohol): Wipe tools between cuts to prevent mold or disease.
- ● Magnifying glass: For inspecting pods or tiny seeds up close.
- ● Humidity-controlled drying area: A dehumidifier or fan speeds up drying if your climate is damp.
- ● Seed-saving envelope: Airtight, labeled envelopes for long-term seed storage.
Step-by-Step instructions for harvesting moonflower bush seed pods
Here's how to collect seeds without wrestling with stubborn vines or losing them to the wind.
🪴 Step 1: Identify and Prepare for Harvest Time
Moonflower seed pods mature in late summer to early fall, typically 6-8 weeks after flowering. Look for pods that have turned brown and begun splitting open—this signals they're ready. I always check plants in the morning when dew is present; the pods are easier to handle when slightly damp.
Wear thin gardening gloves to protect your hands from the pods' fuzzy texture, which can irritate skin. Use a small hand pruner or clean scissors to trim the stems just above the pod. Never pull pods directly off the vine—this can damage the plant and leave behind empty husks.
🌿 Step 2: Collect and Dry the Seed Pods
Place the harvested pods in a paper bag (plastic traps moisture and encourages mold). Hang the bag in a dry, shaded area with good airflow, like a garage or covered porch. I like to use a mesh produce bag for better ventilation if I have one available.
Leave the pods to dry for 1-2 weeks until they're completely brittle—you'll know they're ready when they crumble easily between your fingers. Avoid direct sunlight, which can cause the seeds to overheat and lose viability. If you're in a humid climate, add a small packet of silica gel to absorb excess moisture.
✂️ Step 3: Extract and Store the Seeds
Once the pods are dry, gently crush them between your hands or with a mortar and pestle to release the seeds. I find a clean kitchen towel works well—just place the pods on it and rub them firmly. The seeds will fall through while the chaff remains behind.
Separate the seeds from debris by wafting the mixture gently over a piece of white paper or a seed tray. The flat, dark seeds will stand out against the lighter chaff. Store the clean seeds in an airtight container, like a small glass jar, in a cool, dark place. They'll remain viable for 2-3 years if kept dry.
🌱 Step 4: Plant or Share Your Harvest
For planting, sow seeds directly in the garden after the last frost, about ½ inch deep. Moonflowers thrive in well-draining soil and full sun. I like to plant them near trellises or fences so their vines can climb naturally. If you're not ready to plant, share your seeds with fellow gardeners—they're a popular and easy-to-grow variety.
Label your seed packets with the harvest date and variety if you're saving them for next year. This ensures you'll know exactly when to plant and which type of moonflower you're growing. A little organization now saves headaches later!
Tips & tricks for perfect moonflower seed pod harvesting
Here's what nobody tells you about making this process smoother—and how to avoid the most common pitfalls.
Timing Secret: The 6-8 week window after flowering is critical for harvest timing. I've learned the hard way that pods harvested too early won't contain viable seeds, while waiting too long means they'll burst open and scatter. Mark your calendar when you first spot flowers to track this window accurately—it's the difference between a successful harvest and empty pods.
Harvest Technique: When you're ready to trim pods in Step 1, use a sharp pair of pruning shears rather than scissors for cleaner cuts. The key is to make the cut just above the pod where the stem meets the vine—this prevents tearing and leaves the plant healthier. I also recommend working in the morning when dew is present; the pods are more pliable and less likely to split during handling.
Drying Strategy: During the 1-2 week drying period in Step 2, check your pods every few days by gently squeezing them. They're ready when they crumble easily between your fingers, not just when they feel dry. If you're in a particularly humid climate, consider placing a small fan near your drying area to improve airflow—this can cut your drying time by nearly half without risking overheating.
Storage Wisdom: For long-term seed viability, store your clean seeds in an airtight container with a small packet of silica gel. I've found that adding a few drops of mineral oil to the container creates an additional moisture barrier. Label each container with both the harvest date and variety—this simple step prevents mix-ups when you're ready to plant next season.
Pro Tips for Moonflower Bush Seed Pod
- Here's what nobody tells you about making this process smoother—and how to avoid the most common pitfalls.
- Timing Secret: The 6-8 week window after flowering is critical for harvest timing. I've learned the hard way that pod...
- Harvest Technique: When you're ready to trim pods in Step 1, use a sharp pair of pruning shears rather than scissors ...
Frequently asked questions
Got questions about harvesting moonflower bush seed pods without the twisty struggles? You’re not alone! Here are some of the most common queries—plus quick, stress-free answers to keep your gardening game smooth.
When is the best time to harvest moonflower seed pods?
The ideal time is late fall or early winter after the pods turn brown and papery but before they split open naturally. Harvest on a dry day to prevent mold—think of it as catching the pods at their "just-right" stage, like Goldilocks! If you miss the window, pods may scatter seeds, but you can still collect them (just expect a messier process).
What do I do if the pods twist and won’t open easily?
Twisty pods are a classic frustration, but don’t force it! Try these tricks:
- Gently tap the pod on a hard surface to loosen seeds.
- Use a screwdriver or butter knife to pry open the pod carefully—no brute force!
- Soak pods in warm water for 10–15 minutes to soften them before handling.
Can I save moonflower seeds for next year’s planting?
Moonflower seeds are easy to store for future planting. After harvesting, let them dry completely (1–2 weeks in a cool, dark place), then store them in a paper envelope or airtight container in the fridge. They’ll stay viable for 2–3 years—just don’t refrigerate them with moisture or they’ll mold. Pro tip: Label your container so you remember which variety it is!
What if my moonflower pods don’t produce seeds?
No seeds? Don’t panic—it’s often due to lack of pollination. Moonflowers rely on moths and bees for pollination, so if your garden lacks night-flying visitors, try:
- Planting near other night-blooming flowers (like evening primrose or jasmine).
- Hand-pollinating with a soft paintbrush to transfer pollen between flowers.
- Ensuring your plant gets full sun (6+ hours/day) and well-draining soil.
Are there alternatives to moonflower for easy seed pods?
If moonflowers aren’t your vibe, try these low-maintenance, seed-pod-friendly plants:
Plant
Why It’s Great
Morning Glory
Fast-growing, self-seeds easily, and pods are simple to harvest.
Lupine
Drought-tolerant with striking seed pods; great for pollinators.
Black-Eyed Susan
Hardy annual with fluffy seed heads that add texture to gardens.
Wrapping up and next steps
Growing and harvesting moonflower bush seed pods doesn’t have to be a struggle—it’s all about patience, timing, and the right techniques! 🌙 With the knowledge of when to pick, how to handle them gently, and what to do with your harvest, you’re now ready to enjoy the rewards of your hard work.
Whether you’re saving seeds for next year’s garden or crafting beautiful arrangements, every pod has potential.
Ready to take the next step? Start small—try harvesting just a few pods this season to build your confidence. Before you know it, you’ll be a moonflower pro, sharing your tips with fellow gardeners! Happy harvesting! 🌱