
Propagation
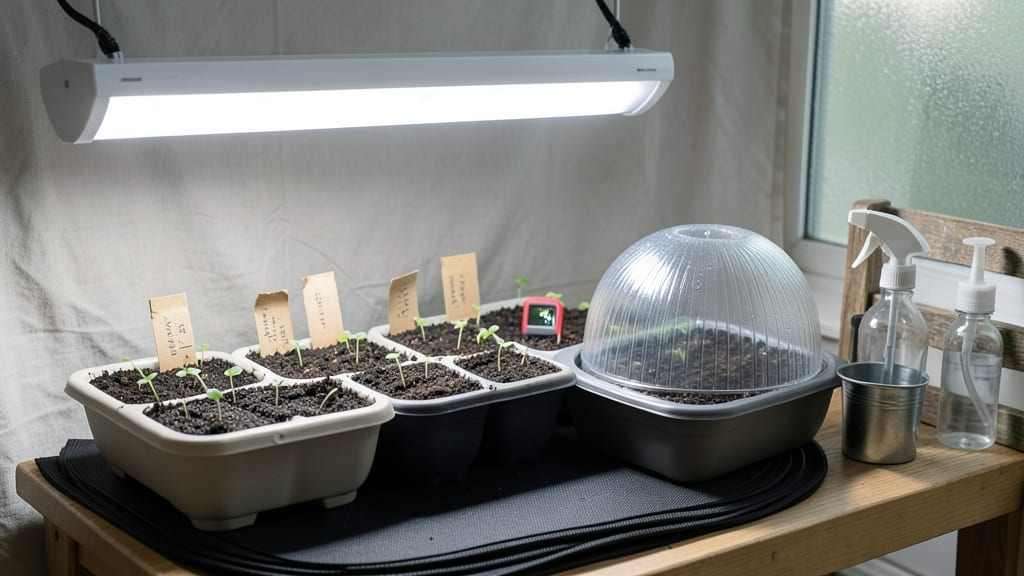
A seed starting kit with light turns your dim windowsill into a seedling powerhouse. 🌱 I've used these kits for years to grow sturdy seedlings that outperform anything from the nursery—no matter how weak the natural light in my apartment.
The right setup gives you control over light, heat, and moisture, which means healthier plants from day one.
Most kits include everything you need: trays, domes, and a grow light that mimics sunlight. My favorite beginner-friendly options cost under $50 and come with easy-to-follow instructions.
The key is matching the light spectrum to your plants—blue for early growth, red for flowering—so you avoid weak, leggy seedlings that flop over when transplanted.
Within 2-3 weeks, you'll see compact, dark-green seedlings ready for their next phase. The light keeps them from stretching toward weak windows, and the domes maintain perfect humidity. No more sad, etiolated sprouts—just robust plants that thrive from the start.
Once they're ready, you'll harden them off in 7-10 days before moving to the garden. The transition is smoother because they're already strong. Perfect for anyone tired of store-bought seedlings that wilt by midsummer—this method works every time.
📚 In This Guide
- What you need
- Instructions
- Tips and common mistakes
- Wrapping up and next steps
What you need
- ● Grow Lights: LED grow light (full-spectrum, 10W–20W) or fluorescent T5 grow light (12"–24" length)
- ● Light fixture with adjustable height (12"–18" above seedlings)
- ● Seed Starting Containers: Seedling trays (1020 or 520 cell count) or biodegradable pots (2–3" diameter)
- ● Grow tray with drainage (if not included)
- ● Growing Medium: Seed starting mix (sterile, peat-based or coco coir blend)
- ● Seeds: Your chosen seeds (check seed packet for depth/light requirements)
- ● Misting Bottle or Spray Nozzle (for gentle watering)
- ○ Timer (optional but helpful) (to automate light cycles, 12–16 hrs/day)
- ● Humidity dome (to retain moisture for delicate seeds)
- ● Heat mat (for warm-season seeds like peppers/tomatoes)
- ● pH testing kit (to monitor soil acidity, ideal: 5.8–6.2)
- ● Labeled markers (for tracking seed varieties)
- ● Reflective surface (aluminum foil or white tray to maximize light efficiency)
How to use a seed starting kit with light for strong seedlings
Here’s the foolproof method I’ve used for years to grow healthy, stocky seedlings that thrive when transplanted.
🌱 Step 1: Set Up Your Grow Light System Properly
Position the grow light 2-4 inches above the seedling trays—closer than you’d think. Most kits come with adjustable arms, so I lower it until it’s just skimming the tallest seedlings. Too far away, and your plants will stretch like they’re reaching for the sky. You’ll see this as long, spindly stems with tiny leaves spaced far apart.
Use a timer to provide 14-16 hours of light daily. I set mine for 16 hours on, 8 hours off to mimic spring conditions. Without this consistency, seedlings grow weak and leggy. Check the light’s intensity—it should feel warm but not hot to the back of your hand. If it’s scorching, raise it immediately to avoid burning tender leaves.
💧 Step 2: Prepare and Plant Your Seeds Correctly
Fill the seed-starting trays with the provided growing medium to just below the rim. Press it down lightly so it’s firm but not compacted—you want roots to push through easily. Moisten it until it’s damp like a wrung-out sponge, not soggy. Overwatering now will smother your seeds before they even sprout.
Sow seeds at the depth recommended on the packet—usually twice the seed’s diameter. I use the tweezers included in most kits to place them precisely. Cover lightly with more medium, then mist gently with water until the surface is evenly damp. Don’t skip this step; seeds need consistent moisture to germinate. Place the trays under the grow light immediately after planting.
☀️ Step 3: Monitor Germination and Light Conditions
Keep the growing medium moist but never waterlogged—top inch dry is your target. I check daily by sticking my finger in; if it feels damp, I wait. If it’s bone dry, I water lightly from below to avoid disturbing seeds. Most seeds sprout within 5-14 days, depending on the type. Watch for the first tiny leaves (cotyledons) to appear—this is your cue that germination is underway.
Once seedlings emerge, raise the grow light to 4 inches above the tallest plants. You’ll notice them growing thicker and sturdier within days. If they start leaning toward the light, rotate the trays a quarter turn daily so they grow straight. Leggy seedlings are a sign the light is too far or the temperature is too low—adjust immediately to prevent weak growth.
✂️ Step 4: Thin Seedlings and Harden Off Before Transplanting
When seedlings have 2-3 true leaves (not the first tiny cotyledons), thin them so only the strongest remains in each cell. Use clean scissors to snip unwanted seedlings at soil level—pulling risks disturbing roots. This reduces competition and gives your plants room to grow. Water gently after thinning to settle the soil around remaining roots.
Two weeks before your last frost date, start hardening off seedlings. Move them outside to a shaded spot for 1-2 hours the first day, gradually increasing time and sun exposure over 10-14 days. You’ll know they’re ready when they handle full sun without wilting. Transplant on a cloudy day or in the evening to reduce stress. Keep the growing medium moist for the first week after transplanting to help roots establish.
Tips & tricks for perfect seed starting with grow lights
Took me years of trial and error to perfect these tricks—now you can skip the guesswork and grow seedlings like a pro.
Light Distance is Everything: In Step 1, that 2-4 inch range isn't just arbitrary—it's about finding the sweet spot where leaves get enough light without burning. I test by holding my hand near the light: if it feels warm but not hot, you're golden. Too close? You'll see crispy leaf edges. Too far? Your seedlings will stretch like they're auditioning for a ballet. Adjust daily as they grow!
Germination Timing Secret: The 5-14 day window in Step 3 can feel like forever, but there's a trick to speed things up. After planting, place the trays in a warm spot (around 70°F) for the first 48 hours—this jumpstarts germination. Once sprouts appear, move them under the grow light immediately. Pro tip: Cover trays with plastic wrap for the first 24 hours to retain moisture, then remove it to prevent mold.
Harden Off Like a Pro: The gradual 10-14 day hardening process in Step 4 is where most people fail. I start with just 1-2 hours on day one, but here's my secret: place seedlings in a spot that gets dappled sunlight—not direct midday heat. This mimics natural shade conditions. Watch for wilting as your indicator: if they perk up within an hour, they're ready for more sun the next day.
Equipment Upgrade: Most kits include basic lights, but if yours feels weak, consider adding a small fan on low setting near the seedlings. This creates airflow that strengthens stems and prevents damping-off disease. Just keep it far enough that you can't feel the breeze on your hand—you want movement, not stress.
Pro Tips for Seed Starting Kit With Light
- Took me years of trial and error to perfect these tricks—now you can skip the guesswork and grow seedlings like a pro.
- Light Distance is Everything: In Step 1, that 2-4 inch range isn't just arbitrary—it's about finding the sweet spot where leaves get enough light without burning.
- Germination Timing Secret: The 5-14 day window in Step 3 can feel like forever, but there's a trick to speed things up.
Frequently asked questions
Got questions about seed starting kits with light?
You’re not alone! Here are answers to the most common queries to help you grow confidently indoors.
What’s the best time of year to start seeds indoors with a light kit?
Most gardeners begin 6–8 weeks before the last frost date in your region. Cool-season crops (like lettuce or spinach) can start earlier, while warm-season plants (tomatoes, peppers) need warmth—so adjust timing based on your climate and seed packet instructions. Check your local frost dates for precision!
Do I need a fancy light kit, or can I use a regular bulb?
A dedicated grow light kit (LED or fluorescent) is ideal because it provides the full light spectrum seeds need to thrive. Regular household bulbs (even bright ones) may not offer enough blue and red light, slowing growth. If budget is tight, a T5 fluorescent bulb is a budget-friendly alternative—just keep it 2–4 inches above seedlings.
How do I know if my seedlings aren’t getting enough light?
Watch for these red flags: leggy, stretched-out stems, yellowing leaves, or seedlings leaning toward the light. If you see these, raise the light closer (but not touching!) or extend the light duration to 14–16 hours/day. Rotate trays daily for even growth—uneven light causes lopsided seedlings.
Are seed starting kits with lights worth the investment?
They save money by letting you grow high-quality seedlings from scratch (no nursery markups) and extend your growing season. Plus, they’re space-efficient for small homes or apartments. For beginners, a $50–$100 kit is a smart starter—just pair it with quality seeds and soil for best results.
Can I reuse a seed starting kit with light for multiple growing seasons?
Yes! Clean and sanitize trays, sterilize soil (or reuse potting mix with fresh amendments), and check light bulbs for wear. Replace grow lights every 1–2 years (they lose efficiency over time). Store unused kits in a dry place to prolong their life—just avoid plastic trays that may degrade from repeated use.
Wrapping up and next steps
Starting seeds with a seed starting kit with light is your golden ticket to a thriving indoor garden—no matter your experience level! 🌱 With the right setup, you’ll enjoy faster germination, healthier seedlings, and a head start on the growing season.
Whether you’re nurturing herbs, veggies, or flowers, this method makes propagation effortless and rewarding.
Now that you’re armed with knowledge, it’s time to roll up your sleeves and get growing! Start small with a few easy seeds, like basil or marigolds, and let your confidence (and green thumb) blossom.
Ready to take the next step? Browse our recommended kits or dive into advanced propagation tips—your future garden awaits! 🌿✨