
Lawn
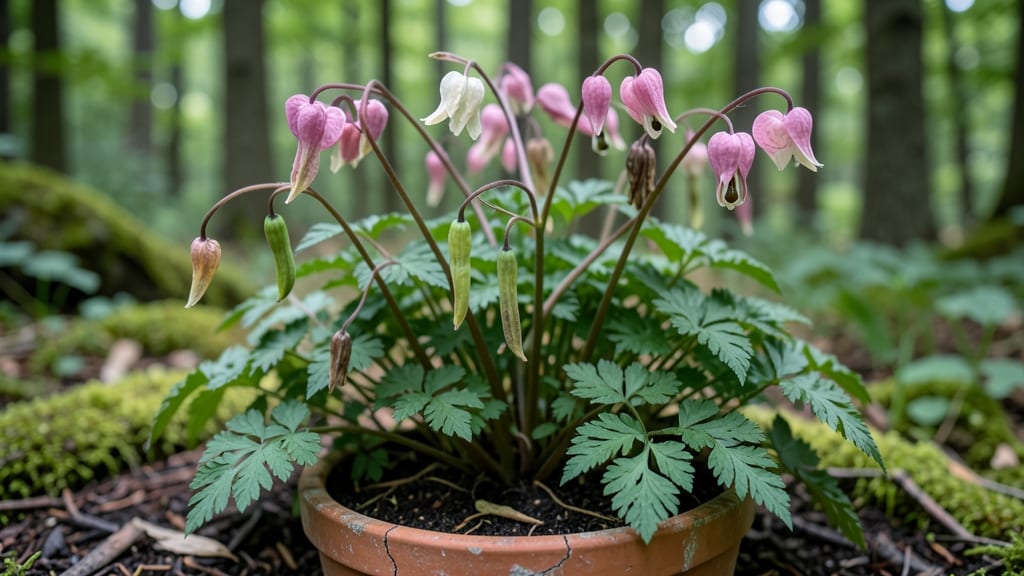
Saving bleeding heart seed pods is easier than you think—no stubborn twisting required. 🌿 I learned the hard way that waiting for pods to split naturally saves time (and your fingers).
The key is timing: harvest when pods turn papery brown but haven't burst open yet, usually in late summer or early fall. You'll need just a few simple supplies: a pair of clean pruners, a paper bag for collecting pods, and a dry, dark place for storage.
The pods contain tiny black seeds that need a cold period to break dormancy, so store them in the fridge for 6-8 weeks before planting. Planting these delicate seeds is where the magic happens. Scatter them on the soil surface in well-draining, partially shaded spots—they need light to germinate.
Keep the soil consistently moist but never soggy, and you'll see seedlings emerge in 2-4 weeks. The real reward comes when those heart-shaped leaves appear next spring, proving that patience with these finicky seeds pays off. Even if some don't germinate, you'll have enough seeds to try again.
📚 In This Guide
- What you need
- Instructions
- Tips and common mistakes
- Wrapping up and next steps
What you need
- ● Mature bleeding heart seed pods – Harvested when they turn brown and begin splitting open (aim for late summer to early fall).
- ● Paper bags or brown paper envelopes – At least 2-3 (one per variety if saving multiple types). Label them clearly!
- ● Pencil or marker – For labeling seed packets with the variety name and harvest date.
- ● Scissors or pruners – To snip seed pods cleanly from the stem.
- ● Drying surface – A clean, well-ventilated area like a wire mesh screen, paper towel, or even a cardboard box with holes punched in it.
- ● Glass jars with lids – For long-term storage (add a silica gel packet to prevent moisture).
- ● Fine-mesh strainer or sieve – To separate seeds from chaff if pods are extra fibrous.
- ● Humidity pack – A small desiccant packet (available at craft stores) to keep seeds dry.
- ● Notebook – To track seed viability, germination rates, or notes on plant performance.
How to harvest bleeding heart seed pods without the frustrating twist
Here's the gentle method I've used for years—no wrestling with stubborn stems or broken fingernails.
🌿 Step 1: Identify Mature Seed Pods
Bleeding heart seed pods turn from green to a papery brown when ready—this usually happens in late summer to early fall. Look for pods that feel dry to the touch and open slightly at the seams. I like to check plants after a morning dew dries off, as wet pods cling stubbornly to stems.
Don't harvest pods that are still green or moist inside. These won't contain viable seeds and will mold if stored. The best pods are the ones that rattle when shaken gently—a sign the seeds are loose inside.
✂️ Step 2: Cut Stems at the Base
Use clean pruning shears to snip the entire flowering stem about 1 inch below the seed pods. This prevents damaging the plant's roots and makes collection easier. I lay a tarp or large cardboard box beneath the plant first—pods scatter easily when they burst open.
Work on a dry day when humidity is low. If rain is forecast, harvest immediately and dry pods indoors. Wet pods develop mold within 24 hours, ruining your entire collection.
🪴 Step 3: Dry and Process the Pods
Spread the cut stems in a single layer on a wire mesh screen or clean towel in a shady, well-ventilated area. Keep them out of direct sunlight, which can overheat the pods and damage seeds. I place mine on a porch with morning sun but afternoon shade.
Turn the stems every 2-3 days to ensure even drying. Pods are ready when they crumble easily between your fingers—this takes about 2-3 weeks depending on your climate. If you live in a humid area, move drying indoors near a fan.
🌱 Step 4: Extract and Store Seeds
Once pods are completely dry, place them in a paper bag and gently squeeze to release seeds. I tap the bag against the counter to dislodge any remaining seeds. Remove any debris by hand—bleeding heart seeds are tiny and black, while chaff is light brown and papery.
Store seeds in an airtight container with a desiccant packet in a cool, dark place. They remain viable for 2-3 years when stored properly. Label your container with the variety and harvest date—bleeding heart varieties can vary significantly!
⏰ Step 5: Plant Your Saved Seeds
Sow seeds in early spring just below the soil surface—about ¼ inch deep. Keep the soil consistently moist until germination, which typically occurs in 3-4 weeks. Bleeding heart seedlings are delicate, so avoid disturbing them once they appear.
Here's the thing—bleeding heart seeds often take 2 years to flower from seed. Don't be discouraged if your first year produces only foliage. The wait is worth it for the stunning heart-shaped blooms that follow!
Tips & tricks for perfect bleeding heart seed collection
Here's what nobody tells you about making seed saving completely stress-free.
Timing Secret: Harvest pods on a dry morning after dew has evaporated—this prevents them from sticking to stems or developing mold. I've learned this the hard way after losing entire collections to wet pods that turned slimy within hours. The 24-hour mold warning in Step 2 isn't exaggerated—humidity is your worst enemy during harvest.
Equipment Upgrade: A small paintbrush comes in handy for Step 4 when removing debris from seeds. The bristles are gentle enough to dislodge seeds from the paper bag without crushing them. I keep one in my seed-saving kit alongside my pruning shears and mesh screen. This simple tool makes cleanup 10 times faster than trying to pick seeds by hand.
Drying Strategy: For the 2-3 week drying period in Step 3, place a small fan on low setting nearby if you're drying indoors. This creates gentle airflow that prevents mold while maintaining even drying. I position the fan so it blows across the pods but doesn't blow them around—just enough to keep the air moving. This works especially well in humid climates where natural ventilation is limited.
Storage Wisdom: The 2-3 year viability window in Step 4 assumes proper storage conditions. I've found that adding a tiny silica gel packet (the kind that comes with new shoes) to your airtight container extends viability even further. These packets absorb excess moisture that could otherwise reduce seed longevity. Just make sure they're the food-safe type labeled for seed storage.
Pro Tips for Bleeding Heart Seed Pods
- Here's what nobody tells you about making seed saving completely stress-free.
- Timing Secret: Harvest pods on a dry morning after dew has evaporated—this prevents them from sticking to stems or de...
- Equipment Upgrade: A small paintbrush comes in handy for Step 4 when removing debris from seeds. The bristles are gen...
Frequently asked questions
Got questions about saving bleeding heart seed pods without the fuss?
You’re not alone! Here are some of the most common concerns—and straightforward answers—to help you master the process like a pro.
How do I know when bleeding heart seed pods are ready for harvesting?
Timing is everything! Harvest pods when they turn tan or light brown and feel slightly papery to the touch. If they’re still green or split open, they’re not ready—wait another 1–2 weeks. Overripe pods may release seeds prematurely, so act fast once they dry out. Pro tip: Check daily in late summer or early fall for the perfect moment.
Why do some pods refuse to open, even when dry?
Don’t stress—this is normal! Some bleeding heart pods are tougher than others and may need a little encouragement. Gently squeeze the pod between your fingers or tap it lightly on a hard surface to coax seeds out. If they’re still stubborn, let them dry indoors for a few more days in a paper bag (with holes for airflow).
Can I save seeds from bleeding heart plants grown in containers?
Container-grown bleeding hearts produce just as many seeds as their in-ground counterparts. Just ensure your pot is large enough (at least 12–18 inches deep) to support healthy plants. Harvesting is identical—watch for dried pods, collect seeds, and store them the same way. Bonus: Container plants often ripen faster in warm climates!
What should I do if my seed pods get rained on before harvesting?
Rain can be a seed saver’s worst enemy, but don’t panic! If pods are still green, wait a few extra days—they’ll finish drying on their own. If they’re already dry but soaked, spread them out on a paper towel or mesh screen in a dry, shaded spot to air-dry. Avoid direct sunlight to prevent mold. Most seeds will still be viable if handled gently.
Are there any alternatives if my bleeding heart plants don’t produce pods?
If your plants skip flowering or podding, check these fixes first:
- Light: Bleeding hearts thrive in partial shade—too much sun or shade can stunt blooms.
- Fertilizer: Over-fertilizing (especially with nitrogen) promotes leaves over flowers. Use a balanced, low-nitrogen fertilizer in early spring.
- Age: Young plants (under 2 years old) may not produce pods. Be patient!
If all else fails, ask a local nursery for seed sources or try propagating from cuttings instead.
Wrapping up and next steps
Saving bleeding heart seed pods doesn’t have to be a frustrating battle—with the right techniques, it’s a rewarding way to propagate these stunning perennials! Whether you’re a seasoned gardener or a curious beginner, the key is patience and gentle handling.
Now that you’re armed with tips to avoid twisting struggles, it’s time to grow your own and share the beauty of bleeding hearts with future seasons.
🌱 Next step: Try your hand at seed saving this fall! Pick a sunny day, gather your supplies, and enjoy the simple joy of nurturing life from these delicate pods. Happy gardening! 🌿